27 Oct 2011

How to Install Windows OS on an External Hard Drive

An external hard drive is a storage device that does not sit inside the computer's chassis. Instead, it connects to the computer via a USB port. Users can carry the external hard drive with them and access their files from any computer in the world. External hard drives can store many hundreds of gigabytes and depend on plug-and-play technology to automatically install all necessary drivers on the host computer when the device is connected to the computer, much like how USB flash drives work.

installing windows on an external hard drive How to Install Windows OS on an External Hard Drive

How to Install Windows OS on an External Hard Drive

Installing Windows OS on an external hard drive is very  similar to installing Windows or any other operating system on an internal hard drive.

1) Backup files by copying them to an external location such as a separate hard drive, CD/DVD, or online server.

2) Before the process begins, go into the BIOS settings and ensure that the CD-ROM drive has the highest drive priority and not the disk drive or some other drive.

3) Insert the Windows OS disk into the disk tray and boot from it. The disk provides the user with options for deleting and overwriting partitions.

4) Find the partition for the external hard drive and delete it in order to reformat the device and install Windows OS.

5) Follow the on-screen instructions as Windows OS installs itself and prepares the device for use.

6) Once Windows OS is installed on the external hard drive, copy all the files back to the external hard drive and use it whenever the device is connected to a computer.

Applications

Windows OS is often installed on an external hard drive in order to use the device's storage capacity in conjunction with Windows OS' processing capabilities. This allows the user to take the device with him/her wherever he/she goes while having a fully functional computer that can fit inside of a backpack, purse, or luggage. Also, Windows OS may be installed on an external hard drive that connects to servers or other devices that do not have their own operating system. This is mostly seen in industrial, commercial, and computer repair applications, although anyone with an external hard drive and a copy of Windows OS can perform it.

Powershell

Windows Powershell is a program that consists of a command-line prompt and provides users with the ability to perform specific operations that cannot be achieved through other means. Windows Powershell is built on top of the .NET Framework and is fully integrated into all .Net Framework applications as well as third-party applications, including graphical user interfaces. Windows Powershell can be used as a stand-alone program or combined with a variety of scripting languages in order to expand its natural functions.

How Powershell Works

Windows Powershell allows users to input a variety of commands that can control functions on both local and remote machines. Windows Powershell is similar to the Windows Command –Line Prompt, but features additional functions that are specifically designed for administrators who manage multiple computers, servers, or other machines, as well as user accounts.

Powershell Powershell

Applications

Windows Powershell can be used for a number of applications, but is specifically designed for administrative use. For example, both Microsoft Exchange Server and Microsoft SQL Server can be controlled and/or enhanced via Windows Powershell. Windows Powershell also features a hosting mechanism that allows it to be embedded into other applications, such as third-party applications that run on the Windows Operating System, but are found on another platform, such as a server.

Advantages

Windows Powershell is advantageous because it allows users to control functions that are not readily available through the Windows GUI, or Graphical User Interface. Windows Powershell is also compatible with a number of platforms, can be embedded into a wide variety of applications, and can be used on both local and remote machines.

Disadvantages

Although Windows Powershell is advantageous, it is designed for use by advanced computer users who have an understanding of basic commands and scripting languages. While Windows Powershell can be used in addition to GUIs to control a variety of programs, Windows Powershell itself does not offer GUI options.

Understanding DNS

Domain Name Service (DNS) Overview

Domain Name Service (DNS) enables applications and users to connect to hosts in TCP/IP based networks by specifying a name. DNS is a hierarchically distributed database that creates hierarchical names that can be resolved to IP addresses. The IP addresses are then resolved to MAC addresses. DNS therefore provides the means for naming IP hosts, and for locating IP hosts when they are queried for by name.

The protocols and standards of DNS provide the following key components:

  • The method for updating address information in a DNS database.

  • The method for querying address information in a DNS database.

  • he schema of the DNS database.

  • The ability of replicating address information between DNS servers in the DNS topology.understanding dns Understanding DNS

The HOSTS files were used to resolve host names to IP addresses before DNS was in existence. The HOSTS files were manually maintained by administrators. The HOSTS file was located on a centrally administered server on the Internet. Each site or location that needed to resolve host names to IP addresses had to at regular intervals download a new copy of the HOSTS file. The size of the HOSTS file grew as the Internet grew. The traffic that was generated from downloading a new copy of the HOSTS file also grew. This led to the design and implementation of Domain Name Service (DNS) in 1984, the hierarchically distributed database that can resolve host names to IP addresses.

The main design requirement of DNS provides the following key features over the HOST file.

  • A hierarchical name space

  • Hostnames in the DNS database can be distributed between multiple servers

  • The database has an unlimited size.

  • Extensible data types

  • Together with supporting host name to IP address mappings, different data types are supported as well.

  • No degrade in performance as more servers are added . the database is scalable.

  • Distribution of administration . naming can be managed individually for each partition.

From the days of Windows NT Server 4.0, DNS has been included with the operating system. DNS is the primary name registration and resolution service in Windows 2000 and Windows Server 2003, and provides the following features and services:

  • A hierarchically distributed and scalable database.

  • Provides name registration, name resolution and service location for Windows 2000 and Windows Server 2003 clients.

  • Locates domain controllers for logon.

The Differences between the NetBIOS Naming System and DNS

Before discussing the differences between the NetBIOS naming system and DNS, lets first look at the different name types used in Windows operating systems:

  • Computer name: This is the name which an administrator assigns to a computer. To verify the computer name of a computer:

    1. Right-click My Computer, and select Properties from the shortcut menu.

    2. Click the Computer Name tab to verify the computer.s name.

  • NetBIOS name: A unique name used to identify a NetBIOS resource on the network. The NetBIOS name is resolved to an IP address for communication to occur.

  • Host name: A host name is assigned to a computer to identify a host in a TCP/IP network. The host name can be described as being the alias that is assigned to a node, to identify it. When the host name is used and not the IP address, the host name has to be resolved to an IP address for IP communication to occur. The HOSTS file is a text file that contains host names to IP addresses mappings. The HOSTS file is stored locally.

  • Fully qualified domain name (FQDN): This is the DNS name that is used to identify a computer on the network. FQDNs have to be unique. The FQDN usually consists of the following:

    1. Host name

    2. Primary DNS suffix

    3. Period

  • DNS Name: A DNS name is name that can include a number of labels that are segregated by a dot. When a DNS name displays the entire path, it is known as the Fully Qualified Domain Name (FQDN).

  • Alias: This is name used instead of another name. The Canonical Name (CNAME) is an alias name in DNS.

  • Nickname: This is another name used for a host. It is usually an abbreviated version of the FQDN. A nickname has to be unique for each node if you want to map it the FQDN.

  • Primary DNS suffix: Computers running in a Windows Server 2003 network are assigned primary DNS suffixes for name registration and name resolution purposes. The primary DNS suffix is also referred to as the primary domain name, or domain name.

  • Connection-specific DNS suffix: This is a DNS suffix which is assigned to an adapter. The connection-specific DNS suffix is called the adapter DNS suffix.

The name differences between the NetBIOS naming system and DNS namespace are noted below:

  • A NetBIOS name cannot be greater than 16 characters.

  • With DNS, up to 255 characters can be used for names.

  • The NetBIOS naming system is a flat naming system.

  • The namespace used by DNS is a hierarchical space, or hierarchical system. The DNS naming system is called the domain namespacef. If you decide to use a private domain namespace, and there is no interaction with the Internet, it does not have to be unique.

Understanding the DNS namespace

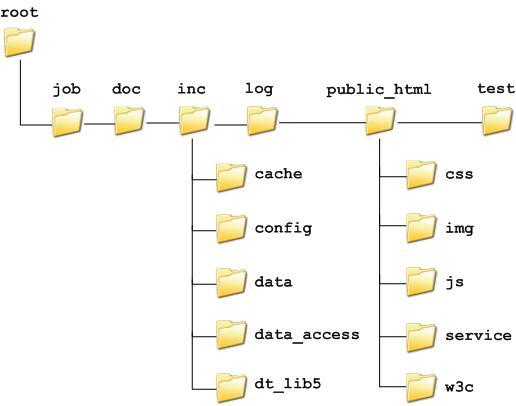
The naming system used by DNS is a hierarchical namespace, called the DNS namespace. The DNS namespace has a unique root. The root can contain numerous subdomains. Each subdomain also can contain multiple subdomains. The DNS namespace uses a logical tree structure wherein an entity is subordinate to the entity which resides over it. Each node in the DNS domain tree has a name, which is called a label. The label can be up to 63 characters. Nodes that are located on the same branch within the DNS domain tree must have different names. Nodes that reside on separate branches in the DNS hierarchy can have the same name.

Each node in the DNS domain tree or DNS hierarchy is identified by a FQDN. This is a DNS domain name that specifies the node.s location in relation to the DNS domain tree/hierarchy. A domain name can be defined as the list of labels along the path from the root of the DNS domain tree/hierarchy to a particular node. The FQDN is the entire list of labels for a specific node.

Each domain registered in DNS is connected to a DNS name server. The DNS server of a domain provides authoritative replies to queries for that particular domain.

Internet Corporation for Assigned Names and Numbers (ICANN) manages the DNS root of the Internet domain namespace. ICANN manages the assignment of globally unique identifiers which are key to the operation of Internet. This includes the following components:

  • Internet domain names

  • IP addresses

  • Port numbers

  • Protocol parameters

Below the root DNS domain are the top-level domains. These top-level domains are also managed by ICANN. The top-level domains managed by ICANN are:

  • Organizational domains: Organizational domains have the following characteristics:

    • Organizational domains can be used globally.

    • They are named via a three-character code.

    • The code defines the main function of the organizations of the DNS domain.

  • Geographical domains: Geographical domains have the following characteristics:

    • Geographical domains are usually used by organizations not residing in the United States.

    • They are named via a two-character country and region codes.

    • The codes were established by the International Organization for Standardization (ISO) 3166.

    • The codes identify a country, such as .uk for the United Kingdom

  • Reverse domains: These domains are used for IP address to name mappings. This is called reverse lookups.

The additional top-level domains defined by ICANN in late 2000 are:

  • .aero; for the air transportation industry

  • .biz; for businesses

  • .coop; for cooperatives

  • .info; for information

  • .museum; for museums

  • .name; for individual names

  • .pro; for credentialed professions such as attorneys.

The common top-level domain names used are:

  • .com; commercial organizations

  • .edu; for educational institutes.

  • .gov; for government.

  • .int; for international organizations.

  • .mil; for military organizations

  • .net; for Internet providers, and networking organizations

  • .org; non-commercial organizations

  • .uk; United Kingdom

  • .us; United States

  • .ca; Canada

  • .jp; Japan

Understanding DNS Components and Terminology

The components which DNS is dependant on and the terminology used when discussing and managing DNS are listed below:

  • DNS server: This is a computer running the DNS Server service, or BIND; that provides domain name services. The DNS server manages the DNS database that is located on it. The DNS server program, whether it is the DNS Server service or BIND; manages and maintains the DNS database located on the DNS server. The information in the DNS database of a DNS server pertains to a portion of the DNS domain tree structure or namespace. This information is used to provide responses to client requests for name resolution.

    When a DNS server is queried it can do one of the following:

    • Respond to the request directly by providing the requested information.

    • Provide a pointer (referral) to another DNS server that can assist in resolving the query

    • Respond that the information is unavailable

    • Respond that the information does not exist

    A DNS server is authoritative for the contiguous portion of the DNS namespace over which it resides.

    The following types of DNS servers exist:

    • Primary DNS server: This DNS server owns the zones defined in its DNS database, and can make changes to
      these zones.

    • Secondary DNS server: This DNS server obtains a read-only copy of zones via DNS zone transfers. A secondary DNS server cannot make any changes to the information contained in its read-only copy. A secondary DNS server can however resolve queries for name resolution. Secondary DNS servers are usually implemented for the following reasons:

      • Provide redundancy: It is recommended to install one primary DNS server, and one secondary DNS server for each DNS zone (minimum requirement). Install the DNS servers on different subnets so that if one DNS server fails, the other DNS server can continue to resolve queries.

      • Distribution of DNS processing load: Implementing secondary DNS servers assist in reducing the load of the
        primary DNS server.

      • Provide fast access for clients in remote locations: Secondary DNS servers can also assist in preventing
        clients from transversing slow links for name resolution requests.

  • DNS zones: A DNS zone is the contiguous portion of the DNS domain name space over which a DNS server has
    authority, or is authoritative. A zone is a portion of a namespace . it is not a domain. A domain is a branch of the
    DNS namespace. A DNS zone can contain one or more contiguous domains. A DNS server can be authoritative for multiple
    DNS zones.

  • Zone files store resource records for the zones over which a DNS server has authority.

  • DNS client: This is a machine that queries the DNS server for name resolution. To issue DNS requests to the
    DNS server, DNS resolvers are used.

  • Queries:The types of DNS queries which can be sent to a DNS server are:

    • Recursive queries

    • Iterative queries

  • DNS resolvers: These are programs that use DNS queries to request information from the DNS servers. In
    Windows Server 2003, the DNS Client service performs the function of the DNS resolver. A DNS resolver can
    communicate and issue name queries to remote DNS servers, or to the DNS server running locally. When a DNS resolver
    receives a response from a DNS server, the resolver caches the information locally. The local cache is then used if the
    same information is requested.

  • Resource records: The DNS database contains resource records (entries) that are used to resolve name
    resolution queries sent to the DNS server. Each DNS server contains the resource records it needs to respond to name
    resolution queries for the portion of the DNS namespace for which it is authoritative.

  • Root servers: A root server performs the following functions when a query cannot be resolved from the local
    zone files:

    • Returns an authoritative answer for a particular domain.

    • Returns a referral to another DNS server that can provide an authoritative answer

How DNS Resolves Queries

A DNS client queries a DNS server to resolve a name. The query contains the following important information:

  • The DNS domain name in the FQDN format.

  • The query type

  • The class for the DNS domain name

A DNS client uses one of three query types to query a DNS server:

  • Iterative queries: The DNS server provides the best answer it can. This can be:

    • The resolved name

    • A referral to a different DNS server

  • Recursive queries: The DNS server has to reply with the requested information, or with an error. The DNS server cannot provide a referral to a different DNS server.

  • Inverse queries: The query sent to the DNS server is to resolve the host name associated with a known IP address. All the domains have to be queried to provide a correct answer to the query.

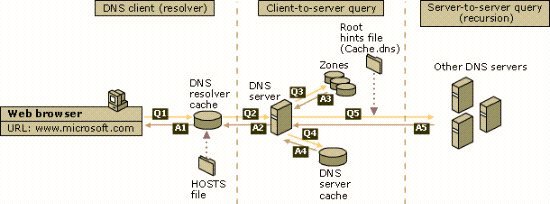
If a DNS server cannot find a match for a queried name in its zone information, or in its cache; the DNS server performs recursion to resolve the name. This is the default configuration for DNS servers. Recursion is the
process whereby which the DNS server queries other DNS servers for the client. By the initial DNS server querying the other DNS servers, recursion actually ends up making the initial DNS server a DNS client!

In order to perform recursion, root hints assist the DNS server in determining where in the DNS namespace it should commence searching for the queried name. Root hints is a collection of resource records which the DNS Server service utilizes to locate DNS servers who are authoritative for the root of the DNS domain namespace structure. If you are using Windows Server 2003 DNS, a preconfigured root hints file named Cache.dns already exists. The file can be found in the WINDOWSSystem32Dns directory. Cache.dns contains the addresses of root servers in the Internet DNS namespace, and is preloaded to memory when the DNS Server service initiates.

If however recursion is disabled for the DNS server, and the DNS server cannot find a match for the queried name in its zone information, or in its cache; the client begins to perform iterative queries. The root hint referrals from the DNS server are used for iterative queries. When a client performs iterative queries, the client sends repeated requests to different DNS servers to resolve the queried name.

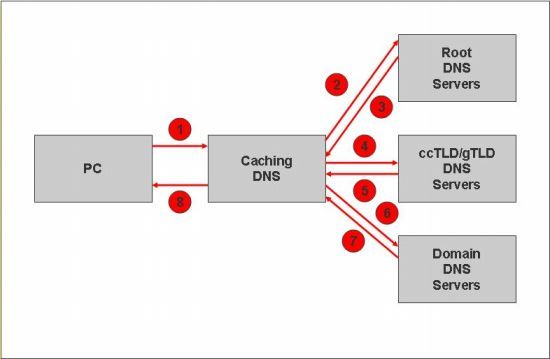
The events that occur to resolve a name requested in a query are explained below:

  1. The resolver sends a recursive DNS query to its local DNS server, to request the IP address of a particular name.

  2. Because the local DNS server cannot refer the resolver to a different DNS server, the local DNS server attempts to resolve the requested domain name.

  3. The local DNS server checks its zones.

  4. If it finds no zones for the requested domain name, the local DNS server sends an iterative query for the requested name to the root DNS server.

  5. The root DNS server is authoritative for the root domain. It responds with an IP address of a name server for the specific top-level domain.

  6. The local DNS server next sends an iterative query for the requested name to this name server who in turn replies with the IP address of the particular name server servicing the requested domain name.

  7. The local DNS server then sends an iterative query for the requested name to the particular name server servicing the particular domain.

  8. The name server responds with the requested IP address.

  9. The IP address is returned to the resolver.

The different query response types which can be returned from the DNS server are:

  • Authoritative answer: This is a positive response which is returned to a client. The authority bit set in the DNS message indicates that the reply was received from a DNS server that has direct authority for the name queried in the message.

  • Positive answer: This response type returns the queried resource record that corresponds to the name and record type queried in the original query.

  • Referral answer: A referral response is returned if the DNS server does not support recursion. A referral contains additional resource records for resolving the request.

  • Negative answer: A negative answer is returned to the client when the following events occur:

    • The name queried does not exist in the DNS namespace. This information is obtained from an authoritative server.

    • The authoritative server indicated that the name queried does exist in the DNS namespace. However, there are no resource records of this type present for the requested name.

How caching works in DNS

In DNS, caching is used to reduce traffic on the network that is generated from queries sent to DNS servers. The DNS Server service and the DNS Client service both utilize caching to improve DNS performance, and reduce DNS specific traffic.

  • DNS Server Cache: When the DNS server performs recursive queries for clients, the DNS server stores the resource records in its DNS server cache. If the same information is requested again, the cached information is used. The contents of the DNS server cache is removed when the DNS Server service is stopped. You can also manually remove the contents of the DNS server cache by using the DNS console, the management console for administering DNS.

  • DNS Client Cache: This cache is also referred to as the DNS resolver cache. Information is added to the DNS client cache when the following events occur:

    • The DNS Client service starts: The records in the HOSTS file are loaded into the DNS client cache.

    • The DNS server responds to a client.s request: When the DNS server returns a response to a query, the information is added to the DNS client cache.

    The contents of the DNS client cache is removed when the DNS Client service is stopped.

DNS Root Servers

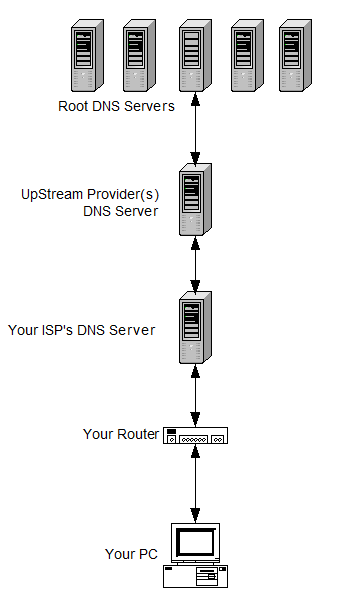
The DNS root servers are thirteen DNS server clusters which are responsible for delegating DNS requests to the top level domain (TLD) nameservers.

The DNS Root Servers

root123 DNS Root Servers

A.ROOT-SERVERS.NET.

Operator: VeriSign Naming and Directory Services
IP Address
: 198.41.0.4

B.ROOT-SERVERS.NET.

Operator: Information Sciences Institute
IP Address: 192.228.79.201

C.ROOT-SERVERS.NET.

Operator: Cogent Communications
IP Address: 192.33.4.12

D.ROOT-SERVERS.NET.

Operator: University of Maryland
IP Address: 128.8.10.90

E.ROOT-SERVERS.NET.

Operator: NASA Ames Research Center
IP Address: 192.203.230.10

F.ROOT-SERVERS.NET.

Operator: Internet Systems Consortium, Inc.
IP Address: 192.5.5.241

G.ROOT-SERVERS.NET.

Operator: U.S. DOD Network Information Center
IP Address: 192.112.36.4

H.ROOT-SERVERS.NET.

Operator: Autonomica/NORDUnet
IP Address: 128.63.2.53

I.ROOT-SERVERS.NET.

Operator: Autonomica/NORDUnet
IP Address: 192.36.148.17

J.ROOT-SERVERS.NET.

Operator: VeriSign Naming and Directory Services
IP Address: 192.58.128.30

K.ROOT-SERVERS.NET.

Operator: Reseaux IP Europeens – Network Coordination Centre
IP Address: 193.0.14.129

L.ROOT-SERVERS.NET.

Operator: Internet Corporation for Assigned Names and Numbers
IP Address: 198.32.64.12

M.ROOT-SERVERS.NET.

Operator: WIDE Project
IP Address: 202.12.27.33

The DNS root servers have not been changed between 29 January, 2004 and today — 22 November, 2006.

To view the canonical list of current DNS root servers, view the named.root file at Internic.


Reverse DNS

Reverse DNS is the process of using DNS to translate IP addresses to hostnames.

It is the opposite of forward DNS, which is used to translate hostnames to IP addresses.

Internet names are those used to refer to hosts on the Internet, such as www.tech-faq.com and www.freebsd.org.

IP addresses are the numbers that Internet routers use to move traffic across the Internet, such as 216.17.138.115 and 216.136.204.117.

Reverse DNS Lookups

One of the best ways to understand reverse DNS is to use the DNS testing tool, `nslookup` to do a sample reverse DNS lookup.

Here is an example of using `nslookup` to do a reverse DNS lookup on the IP address 216.136.204.117:

bash-2.05a$ nslookup 216.136.204.117
Server: localhost.net
Address: 127.0.0.1

Name: www.freebsd.org
Address: 216.136.204.117

Reverse DNS PTR Records

reverse Reverse DNS

Reverse DNS is setup by configuring PTR records (Pointer Records) in the DNS server.

This is in contrast to Forward DNS, which uses A records (Address Records).

Reverse DNS Delegation

When someone registers a domain name with a domain registrar, he/she usually becomes responsible for that Forward DNS domain. In DNS terms, the domain is delegated to the person who registers the domain name.

However, this person is not responsible for his/her reverse records. His/her Reverse DNS records are still most likely the responsibility of your hosting facility or ISP.

To change the Reverse DNS PTR records, contact the company where the IP address came from, usually a hosting facility or an ISP.

Alternatively, the ISP or hosting company may delegate a range of IP addresses to the user, in which case the user must configure Reverse DNS and PTR records in his/her DNS server.

Is Reverse DNS Necessary?

Some junior DNS administrators configure forward DNS and forget to configure reverse DNS.

When they do this, some things work fine. Internet web browsing, for example, works great. However, not everything works.

Reverse DNS is required by some Internet protocols and by extensions to some other Internet protocols. Without reverse DNS, users will experience trouble with r-commands, IRC, some SMTP servers, most enterprise management systems, and many network backup systems.

Troubleshooting problems that faulty or non-existent reverse DNS cause can take considerable time and effort. It is much better to ensure that reverse DNS is configured correctly from the beginning.

How to Perform a DNS Lookup

Finding out information about a particular web site, such as who owns the domain, can be easily accomplished by using the following specified search engines. Here are the basics of doing a DNS lookup based on the URL, as well as an outline for performing a reverse DNS lookup.

Basic DNS Lookup

Many organizations offer the ability to enter the web address to find out (1) if the domain name is currently active, and (2) where to go in order to learn more about who owns the domain name. Just about any company that registers domain names or offers hosting services will have this capability prominently posted along with the data about their product offerings. In addition, there are several sites that specialize in providing access to the published data surrounding the ownership of domain names.

lookupdns How to Perform a DNS Lookup

Generally, the process is a matter of entering the domain name in a field and then clicking on a search key. The search engine will query public records relating to domain names, return confirmation that the domain name does exist, and offer the opportunity to be redirected to a site that provides more detail about the owner and the current expiration date. In some cases, all the information required to contact the owner about possible purchasing rights to the domain name.

Reverse DNS Lookup

Performing a reverse DNS lookup is somewhat similar to this basic method. What is different is that the search criteria may consist of more than one type of data. For example, a reverse DNS lookup may be conducted using an IP address, the name of a firm, or even the name of an individual. The same type of public information that is available through a basic lookup is also accessible with the reverse mode of lookup.

Why Perform a DNS Lookup?

A DNS lookup is handy for several applications. First, it is a quick way to check on the availability of a domain name that an individual or company wants to acquire. Second, it is a great way to research the business operations of another entity. Last, it is a great way to investigate the origin of unwanted electronic communications, and possibly be able to put a stop to them.

Public DNS Servers

A DNS server enables people and applications to look up records in DNS tables. Most DNS servers are now private, meaning that they are configured to only provide service to the people and organizations who own and maintain them.

A few domain name servers on the Internet provide DNS resolutions for anyone who requests it. These are known as "Public DNS Servers."

Most public DNS servers are public on purpose. A few public DNS servers are public only because their system administrators have misconfigured them. Those DNS servers tend to get fixed eventually.

ps logo2 Public DNS Servers

Google

8.8.8.8
8.8.4.4

Level 3 Communications (Broomfield, CO, US)

4.2.2.1
4.2.2.2
4.2.2.3
4.2.2.4
4.2.2.5
4.2.2.6

Verizon (Reston, VA, US)

151.197.0.38
151.197.0.39
151.202.0.84
151.202.0.85
151.202.0.85
151.203.0.84
151.203.0.85
199.45.32.37
199.45.32.38
199.45.32.40
199.45.32.43

GTE (Irving, TX, US)

192.76.85.133
206.124.64.1

One Connect IP (Albuquerque, NM, US)

67.138.54.100

OpenDNS (San Francisco, CA, US)

208.67.222.222
208.67.220.220

Exetel (Sydney, AU)

220.233.167.31

VRx Network Services (New York, NY, US)

199.166.31.3

SpeakEasy (Seattle, WA, US)

66.93.87.2
216.231.41.2
216.254.95.2
64.81.45.2
64.81.111.2
64.81.127.2
64.81.79.2
64.81.159.2
66.92.64.2
66.92.224.2
66.92.159.2
64.81.79.2
64.81.159.2
64.81.127.2
64.81.45.2
216.27.175.2
66.92.159.2
66.93.87.2

Sprintlink (Overland Park, KS, US)

199.2.252.10
204.97.212.10
204.117.214.10

Cisco (San Jose, CA, US)

64.102.255.44
128.107.241.185

logo2 Public DNS Servers

OpenNIC

How to Find DNS Servers

The easiest way to find DNS servers is by using the 'nslookup' tool.

  • Start nslookup
  • Set the search type to NS. This tells nslookup to search for nameservers
  • Finally, enter the domain name for the nameservers being searched for

Here are some search examples for the most popular searches:

Finding the Lincsat DNS Servers

$ nslookup
> set type=ns
> lincsat.com
Server: 66.37.143.12
Address: 66.37.143.12#53

Non-authoritative answer:
lincsat.com nameserver = ns2.anywarenetworks.com.
lincsat.com nameserver = ns1.anywarenetworks.com.

to Find DNS Servers How to Find DNS Servers

Authoritative answers can be found from:

Finding the MCI DNS Servers

$ nslookup
> set type=ns
> mci.com
Server: 66.37.143.12
Address: 66.37.143.12#53

Non-authoritative answer:
mci.com nameserver = auth61.ns.uu.net.
mci.com nameserver = auth300.ns.uu.net.
mci.com nameserver = auth310.ns.uu.net.
mci.com nameserver = DNS1.mci.com.
mci.com nameserver = DNS2.mci.com.
mci.com nameserver = DNS3.mci.com.
mci.com nameserver = DNS4.mci.com.
mci.com nameserver = auth01.ns.uu.net.
mci.com nameserver = auth50.ns.uu.net.

Authoritative answers can be found from:
DNS3.mci.com Internet address = 199.249.19.2
DNS4.mci.com Internet address = 199.249.18.2

Finding the Shaw Cable DNS Servers

$ nslookup
> set type=ns
> shaw.ca
Server: 66.37.143.12
Address: 66.37.143.12#53

Non-authoritative answer:
shaw.ca nameserver = ns10sc.cg.shawcable.net.
shaw.ca nameserver = ns7.no.cg.shawcable.net.

Authoritative answers can be found from:
ns10sc.cg.shawcable.net Internet address = 204.209.208.51

Finding the Comcast DNS Servers

$ nslookup
> set type=ns
> comcast.net
Server: 66.37.143.12
Address: 66.37.143.12#53

Non-authoritative answer:
comcast.net nameserver = dns02.jdc01.pa.comcast.net.
comcast.net nameserver = adns.cmc.comcast.net.
comcast.net nameserver = dns01.jdc01.pa.comcast.net.

Authoritative answers can be found from:
dns01.jdc01.pa.comcast.net Internet address = 68.87.96.3
dns02.jdc01.pa.comcast.net Internet address = 68.87.96.4

understanding dns queries and lookups Understanding DNS Queries and Lookups

DNS Queries Overview

The naming system used by DNS is a hierarchical namespace, called the DNS namespace. The DNS namespace has a unique root. The root can contain numerous subdomains. Each subdomain also can contain multiple subdomains. Each domain registered in DNS is connected to a DNS name server. The DNS server of a domain provides authoritative replies to queries for that particular domain.

The DNS server manages the DNS database that resides on it. DNS server is authoritative for the contiguous portion of the DNS namespace over which it resides. Primary DNS servers own the zones defined in its DNS database, and can make changes to these zones. Secondary DNS server obtains a read-only copy of zones through DNS zone transfers.

Three query types exist for querying a DNS server for name resolution:

  • Iterative queries

  • Recursive queries

  • Inverse queries

understanding dns queries and lookups Understanding DNS Queries and Lookups

A DNS client queries a DNS server to resolve a host name into an IP address. The query contains the following important information:

  • The DNS domain name in the FQDN format.

  • The query type

  • The class for the DNS domain name

When a DNS server is queried it can do one of the following:

  • Respond to the request directly by providing the requested information.

  • Provide a pointer (referral) to another DNS server that can assist in resolving the query

  • Respond that the information is unavailable

  • Respond that the information does not exist

The different query response types which can be returned from the DNS server are:

  • Authoritative answer: This is a positive response which is returned to a client. The authority bit set in the DNS message indicates that the reply was received from a DNS server that has direct authority for the name queried in the message.

  • Positive answer: This response type returns the queried resource record that corresponds to the name and record type queried in the original query.

  • Referral answer: A referral response is returned if the DNS server does not support recursion. A referral contains additional resource records for resolving the request.

  • Negative answer: A negative answer is returned to the client when the following events occur:

    • The name queried does not exist in the DNS namespace. This information is obtained from an authoritative server.

    • The authoritative server indicated that the name queried does exist in the DNS namespace. However, there are no resource records of this type present for the requested name.

If a DNS server cannot find the queried name in its zone information, or in its cache; the DNS server performs recursion to resolve the name. This is the default configuration for DNS servers. Recursion is the process whereby which the DNS server queries other DNS servers for the client. By the initial DNS server querying the other DNS servers, recursion actually ends up making the initial DNS server a DNS client! In order to perform recursion, root hints assist the DNS server in determining where in the DNS namespace it should commence searching for the queried name.

Root hints is a collection of resource records which the DNS Server service utilizes to locate DNS servers who are authoritative for the root of the DNS domain namespace structure. If you are using Windows Server 2003 DNS, a preconfigured root hints file named Cache.dns already exists. The file can be found in the WINDOWSSystem32Dns directory. Cache.dns contains the addresses of root servers in the Internet DNS namespace, and is preloaded to memory when the DNS Server service initiates. If however recursion is disabled for the DNS server, and the DNS server cannot find a match for the queried name in its zone information, or in its cache; the client begins to perform iterative queries. The root hint referrals from the DNS server are used for iterative queries. When a client erforms iterative queries, the client sends repeated requests to different DNS servers to resolve the queried name.

The process that occurs to resolve a name requested in a query is outlined below:

  1. The resolver sends a recursive DNS query to its local DNS server, to request the IP address of a particular name.

  2. Because the local DNS server cannot refer the resolver to a different DNS server, the local DNS server attempts to resolve the requested domain name.

  3. The local DNS server checks its zones.

  4. If it finds no zones for the requested domain name, the local DNS server sends an iterative query for the requested name to the root DNS server.

  5. The root DNS server is authoritative for the root domain. It responds with an IP address of a name server for the specific top-level domain.

  6. The local DNS server next sends an iterative query for the requested name to this name server who in turn replies with the IP address of the particular name server servicing the requested domain name.

  7. The local DNS server then sends an iterative query for the requested name to the particular name server servicing the particular domain.

  8. The name server responds with the requested IP address.

  9. The IP address is returned to the resolver.

Understanding Recursive Queries

When a client sends a recursive query to a DNS server, the DNS server has to return either of the following responses.

  • The resource record containing the IP address that is associated with the host name that was requested.

  • An error message can also be returned to the client, stating that the host name or domain does not exist. When the DNS server does not find the queried name in its zone information, it starts querying other DNS servers. The error is only returned to the client when it cannot obtain the required information from any of the other DNS servers.

You can use the DNS console to disable recursive queries for a specific DNS server. In this case, the DNS server will only be able to use iterative queries.

Understanding Iterative Queries

When a client sends an iterative query to a DNS server, the DNS server returns the best answer which it can to the client.

The response can be either of the following:

  • The requested resolved name.

  • A referral to a different DNS server that could provide the information which the client requested.

Referrals are just pointers to a DNS server that has authority for a lower portion of the DNS namespace.

Understanding Inverse Queries

In an inverse query, the DNS resolver sends a request to a DNS server to resolve the host name associated with a known IP address. Only a thorough search of all domains would provide the correct answer. DNS resolvers are programs that use DNS queries to request information from the DNS servers. In Windows Server 2003, the DNS Client service performs the function of the DNS resolver. A DNS resolver can communicate and issue name queries to remote DNS servers, or to the DNS server running locally.

Understanding Forward Lookups and Reverse Lookups

These types of lookups or queries are defined below:

  • Forward Lookups: Forward lookups are also called forward queries. Forward lookups are used to resolve host names to IP addresses in the DNS domain.
    Forward queries contain the following:

    • SOA resource record.

    • NS resource record.

    • Any other record that ties the IP address to the FQDN (excludes the PTR resource record).

    When forward queries are issued, they are dealt with as follows:

    • A resolver requests the IP address for a host name.

    • The forward lookup is sent to the DNS server.

    • The DNS server searches for an A type resource record that is associated with the host name in the request.

    • If the DNS server finds a matching A type resource record, the IP address is returned o the client.

    • If the DNS server does not find a match, it proceeds to query the other DNS servers.

  • Reverse Lookups: Reverse lookups are also known as reverse queries. The process that occurs when reverse lookups are sent is illustrated below:

    • A resolver requests the domain name for a specific IP address.

    • The reverse lookup zone is used to resolve the query. A reverse lookup zone contains PTR resource records. These records are used for reverse lookups to point to A resource records.

How to disable recursive queries for a specific DNS server

  1. Click Start, Administrative Tools, and then click DNS to open the DNS console.

  2. In the console tree, select the specific DNS server that you want to disable recursive queries for, and then select Properties from the shortcut menu.

  3. When the Properties dialog box of the DNS server opens, click the Advanced tab.

  4. Select the Disable Recursion option in the Servers Options list.

  5. Click OK

DNS

Domain Name System (DNS) is an Internet Engineering Task Force (IETF) standard name service that allows a computer to register and resolve domain names. The DNS makes it possible to assign domain names to organizations independent of the routing of the numerical IP address. In other words, DNS is a system that translates domain names into IP addresses. This is necessary because computers only use IP addresses, yet only human readable names are used since the names are easier to remember than IP addresses. Without this DNS resolution, the Internet would be a very inconvenient place. DNS resolution is therefore a very important task. However, users may sometimes try to connect to a system by name and get a DNS error because the name did not resolve to the proper IP address. There are several causes for this:
  • The DNS server is down
  • IP connectivity gets lost and thus the DNS cannot resolve it
  • DNS cache poisoning
  • Update and zone issues
  • The DNS server does not have network connectivity to the root servers

There are a number of ways to find out whether a system is resolving properly, nslookup can be used to verify name resolution. The nslookup command can be used to find various details relating to a particular DNS (Domain Name System) such as IP address, MX records, etc.

dns list DNS

Go to the command prompt and type in nslookup host_name server_IP_address. Replace the actual host name to be resolved for host_name and the IP address of the DNS server for server_IP_address then press enter.

This allows the user to verify if an error is on the server, if there is a widespread resolution error, or if the server is possibly down. Nslookup will also display the various types of DNS records, not just primary (A) records, or all records for a domain. Users can then ping with the switch to also verify if DNS resolution is working fine.

Troubleshoot the dns client since most problems start with failed queries at the client. If a dns server provides incorrect data to queries that it successfully answers, then the most likely causes are:

  • Resource records (RRs) were not dynamically updated in a zone.
  • An error was made when manually adding or modifying static resource records in the zone.
  • Stale resource records in the DNS server database left from cached lookups or zone records not updated with current information or removed when they were no longer needed.

If the DNS server does not resolve names for external networks, then the possible causes could be:

  • The recursive query times out before it can be completed.
  • A remote DNS server fails to respond.
  • A remote DNS server provides incorrect data.
  • DNS server recursion has been disabled.

Also troubleshoot the connectivity to the root servers. Verify that the DNS server used in a failed query can ping its root servers by IP address. If a ping attempt to one root server fails, it might indicate that an IP address for that root server has changed.

23 Oct 2011

How to Send SMTP Email Using PowerShell (Part 1)

A useful technique for Exchange Server administrators is to be able to send email messages via SMTP from PowerShell.

There are a few different ways to do this, depending on the version of PowerShell installed on your computer or server. You can check the version number by typing $host in a PowerShell window.

PowerShell 1.0 will show this result:

PS C:\> $host  Name             : ConsoleHost Version          : 1.0.0.0

PowerShell 2.0 will show this result:

PS C:\> $host  Name             : ConsoleHost Version          : 2.0

Let's take a look at how we can send SMTP email using each version of PowerShell.

Sending SMTP Email with PowerShell 1.0

For PowerShell 1.0 we can send mail by running these commands.

PS C:\> $smtp = New-Object Net.Mail.SmtpClient("ho-ex2010-caht1.exchangeserverpro.net") PS C:\> $smtp.Send("reports@exchangeserverpro.net","administrator@exchangeserverpro.net","Test Email","This is a test")

So what did we just do there? Let's break it down.

  1. Created a new instance of a .NET object of class SmtpClient, connected to the SMTP server ho-ex2010-caht1 (a Hub Transport server)
  2. Used the Send method of the object to send an email message with the following:

That works fine, though perhaps a bit cumbersome to type it out every time. Instead what we could do is create a script to send SMTP email using PowerShell 1.0.

# #.SYNOPSIS #Sends SMTP email via the Hub Transport server # #.EXAMPLE #.\Send-Email.ps1 -To "administrator@exchangeserverpro.net" -Subject "Test email" -Body "This is a test" #  param( [string]$to, [string]$subject, [string]$body )  $smtpServer = "ho-ex2010-caht1.exchangeserverpro.net" $smtpFrom = "reports@exchangeserverpro.net" $smtpTo = $to $messageSubject = $subject $messageBody = $body  $smtp = New-Object Net.Mail.SmtpClient($smtpServer) $smtp.Send($smtpFrom,$smtpTo,$messagesubject,$messagebody)

We can save that code as Send-Email.ps1 and run it from the PowerShell window.

PS C:\Scripts> .\Send-Email.ps1 -To "administrator@exchangeserverpro.net" -Subject "Test email" -Body "This is a test"

Less typing required, especially when you hard-code some of the variables such as the From address and SMTP server.

Sending SMTP Email with PowerShell 2.0

PowerShell 2.0 makes life a little easier thanks to the built in cmdlet Send-MailMessage. To send the same email as the above example we would run this command:

PS C:\> Send-MailMessage -From "reports@exchangeserverpro.net" -To "administrator@exchangeserverpro.net" -Subject "Test email" -Body "This is a test email"

One of the first things you might notice in the command above is that no SMTP server was specified. Send-MailMessage does have a -SmtpServer parameter, but if you don't specify one it will just use the $PSEmailServer preference variable instead. This can be set for the session by running the following command:

PS C:\> $PSEmailServer = "ho-ex2010-caht1.exchangeserverpro.net"

Another point to note with Send-MailMessage is that is uses authenticated SMTP connections. By default it will use the credentials of the user executing the command. So you need to make sure you're using an SMTP server that either:

  • Permits that authenticated user credential to send email messages via SMTP
  • Accepts anonymous SMTP/relay for the IP address of the sending host (you can see how to configure a relay connector for Exchange here)

Those are just a few simple examples of how to send email using SMTP and PowerShell 1.0 or 2.0.

How to Send SMTP Email Using PowerShell

In the last part of this series we looked at simple techniques for sending email from PowerShell. In this article we'll take a closer look at how you can create the email message body for emails that you are sending via PowerShell.

In the last article I demonstrated a simple PowerShell script for sending emails that contained the following code, using the SmtpClient .NET object .

# #.SYNOPSIS #Sends SMTP email via the Hub Transport server # #.EXAMPLE #.\Send-Email.ps1 -To "administrator@exchangeserverpro.net" -Subject "Test email" -Body "This is a test" #  param( [string]$to, [string]$subject, [string]$body )  $smtpServer = "ho-ex2010-caht1.exchangeserverpro.net" $smtpFrom = "reports@exchangeserverpro.net" $smtpTo = $to $messageSubject = $subject $messageBody = $body  $smtp = New-Object Net.Mail.SmtpClient($smtpServer) $smtp.Send($smtpFrom,$smtpTo,$messagesubject,$messagebody)

Now let's build on that example by adding more content to the message body of the emails.

Using Command Output as Email Message Content with PowerShell

When running this script anything that we specify with the -Body parameter will be the message body of the email. It could be a text string, or it could even be the output from another PowerShell command. For example:

[PS] C:\Scripts>.\Send-Email.ps1 -To "administrator@exchangeserverpro.net" -Subject "List of Exchange Servers" -Body (Get-ExchangeServer)

The command above would produce an email that looks like this:

Neat trick, but notice how the list of Exchange servers appears as all one string that wraps over two lines? Wouldn't it be nicer to see the server names displayed in an easier to read list format? Let's take a look at how you can achieve that.

[PS] C:\Scripts>[string]$emailbody = ""  [PS] C:\Scripts>$servers = Get-ExchangeServer  [PS] C:\Scripts>foreach ($server in $servers) {$emailbody = $emailbody + $server.name + "`r`n"}  [PS] C:\Scripts>.\Send-Email.ps1 -To "administrator@exchangeserverpro.net" -Subject "List of Exchange Servers" -Body $emailbody

So what did I do there? Here are the steps I just followed:

  1. Declare a variable $emailbody as type string. This will be the variable that is passed to the script to be the message body of the email that gets sent.
  2. Used the Get-ExchangeServer cmdlet to retrieve a list of the Exchange servers in the organization into an array of $servers.
  3. Looped through the array using the ForEach-Object (abbreviated to "foreach") cmdlet and appended each server name to the $emailbody string, including (and this is the important part) a carriage return after each server name.
  4. Ran the script using the $emailbody variable for the -Body script parameter.

The result is an email that looks like this; much better don't you agree?

Now this is only a demonstration. In reality you probably aren't going to want to send yourself an email with a list of your Exchange servers, at least not very often.

However you can use the same techniques I've just demonstrated to build scripts that email you any command or script output, such as a list of mailboxes with no storage quotas that you have emailed to yourself automatically each month.

Using File Contents as Email Message Content with PowerShell

Another technique for getting content for the message body of an email sent via PowerShell is to use the contents of a file.

For example, I run continuous pings between certain servers to detect any network interruptions that may be occurring. An entry is written to a log file any time a ping times out. Every day I want to receive an email with the results of the previous day's ping monitoring, so I can do that using a script like this.

# #.SYNOPSIS #Sends daily dropped ping report # #.EXAMPLE #.\Send-DroppedPingReport.ps1 #  $smtpServer = "ho-ex2010-caht1.exchangeserverpro.net" $smtpFrom = "reports@exchangeserverpro.net" $smtpTo = "administrator@exchangeserverpro.net" $messageSubject = "Dropped ping report"  [string]$messagebody = ""  $logs = Get-Content C:\Logs\droppedpings.log  foreach ($log in $logs ) { 	$messagebody = $messagebody + $log + "`r`n" }  $smtp = New-Object Net.Mail.SmtpClient($smtpServer) $smtp.Send($smtpFrom,$smtpTo,$messagesubject,$messagebody)

This is the same technique that was used earlier to create an array and loop through it to add the carriage returns so that the email is formatted nicely. The main difference is the use of Get-Content instead of Get-ExchangeServer.

As you can see it is very simple to create useful, informative emails that are sent by your PowerShell scripts.

PowerShell Script to Create a Mailbox Size Report for Exchange Server 2010

One of the Exchange Server administration tasks I perform almost every day is creating mailbox size reports. There are a few different reasons that I create these reports, such as planning a mailbox migration project, responding to a storage capacity alert for a particular database, or providing a specific team of people with a report of their mailbox sizes.

Now it is pretty easy to get the sizes for Exchange mailboxes and to handle the formatting of the Exchange 2010 mailbox statistics so that they are easier to perform calculations on, but it gets a bit boring running those commands day after day.

Even worse, after running the commands to create a CSV report I still had to open that in Excel, remove the unwanted details, use Excel formulas to convert the values from bytes to megabytes, sort them into order, and so on. Again not difficult, just boring after doing it hundreds of times.

So I created a PowerShell script to do all of the heavy lifting for me, and I'm sharing that script with you here. Let's take a look at how the script works.

Firstly the script accepts two optional parameters; -database or -file. These tell the script whether to run a report on a given mailbox database, or to run a report on a list of mailbox names in a text file.

param( 	[string]$database = "", 	[string]$file = "" )

You can specify either parameter, but not both at once, nor can you run the script without any parameters.

#Determine whether correct parameters have been used  if( $database -eq "" -and $file -eq "" ) { 	Write-Host -ForegroundColor Red "You must specify either -database or -file" }  if( $database -ne "" -and $file -ne "" ) { 	Write-Host -ForegroundColor Red "You can't use both -database and -file" }

With the correct parameter used the script executes one of two functions to generate the report.

#Get the report  if( $database -ne "" ) { 	Get-ReportDBMode $database }  if( $file -ne "" ) { 	Get-ReportFileMode $file }

Those functions simply retrieve the mailbox statistics, sort them in order of largest to smallest, perform the conversions of the values from bytes to megabytes, and then clean up the output to just the relevant information.

#................................... # Functions #...................................  function Get-ReportDBMode {  	param ($database) 	$report = Get-MailboxStatistics -database $database | Sort-Object TotalItemSize -Descending | Select-Object DisplayName,@{Label="Size(Mb)"; Expression={$_.TotalItemSize.Value.ToMb()}},LastLogonTime 	return ($report) }  function Get-ReportFileMode {  	param ($file) 	$report = Get-Content $file | Get-MailboxStatistics | Sort-Object TotalItemSize -Descending | Select-Object DisplayName,@{Label="Size(Mb)"; Expression={$_.TotalItemSize.Value.ToMb()}},LastLogonTime 	return ($report) }

The output will be similar to this:

Here are a few examples of how to run the script:

.\Get-MailboxReport.ps1 -database MB-HO-01  .\Get-MailboxReport.ps1 -file .\users.txt  .\Get-MailboxReport.ps1 -file .\users.txt | Export-CSV -NoTypeInformation -Path report.csv

Here is the complete script:

#Get-MailboxReport.ps1 #Written By: Paul Cunningham #URL: http://exchangeserverpro.com # #Change Log #V1.0, 15/10/2011 - Initial version # #.SYNOPSIS #Lists the mailboxes and mailbox sizes for #the specified database or list of users. Output #is sorted by TotalItemSize in descending order. # #.EXAMPLE #.\Get-MailboxReport.ps1 -database MB-HO-01 #Returns a report with the mailbox statistics for all mailbox users in #database MB-HO-01 # #.EXAMPLE #.\Get-MailboxReport.ps1 -file .\users.txt #Returns a report with the mailbox statistics for all mailbox users in #the file users.txt # #.EXAMPLE #.\Get-MailboxReport.ps1 -file .\users.txt | Export-CSV -NoTypeInformation -Path report.csv #Exports the report into a CSV file so that it can be opened in Microsoft Excel for #further analysis #  param( 	[string]$database = "", 	[string]$file = "" )  #................................... # Static Variables #...................................  #................................... # Functions #...................................  function Get-ReportDBMode {  	param ($database) 	$report = Get-MailboxStatistics -database $database | Sort-Object TotalItemSize -Descending | Select-Object DisplayName,@{Label="Size(Mb)"; Expression={$_.TotalItemSize.Value.ToMb()}},LastLogonTime 	return ($report) }  function Get-ReportFileMode {  	param ($file) 	$report = Get-Content $file | Get-MailboxStatistics | Sort-Object TotalItemSize -Descending | Select-Object DisplayName,@{Label="Size(Mb)"; Expression={$_.TotalItemSize.Value.ToMb()}},LastLogonTime 	return ($report) }  #................................... # Script #...................................  #Determine whether correct parameters have been used  if( $database -eq "" -and $file -eq "" ) { 	Write-Host -ForegroundColor Red "You must specify either -database or -file" }  if( $database -ne "" -and $file -ne "" ) { 	Write-Host -ForegroundColor Red "You can't use both -database and -file" }  #Get the report  if( $database -ne "" ) { 	Get-ReportDBMode $database }  if( $file -ne "" ) { 	Get-ReportFileMode $file }

Using Test-ServiceHealth for Exchange Server Health Checks

As the name suggests, Test-ServiceHealth checks the state of the services that should be running on the Exchange server. One of the best things about this cmdlet is that it checks the services depending on the Exchange server roles that are installed.

So for example, for a Hub Transport server only those services relating to the Hub Transport role will be checked. While for a "typical" Exchange 2010 server the services for the Hub Transport, Client Access, and Mailbox server roles will be checked.

Here is an example of the Test-ServiceHealth results.

[PS] C:\>Test-ServiceHealth br-ex2010-mb  Role                    : Mailbox Server Role RequiredServicesRunning : True ServicesRunning         : {IISAdmin, MSExchangeADTopology, MSExchangeIS, MSExchangeMailboxAssistants, MSExchangeMailSub                           mission, MSExchangeRepl, MSExchangeRPC, MSExchangeSA, MSExchangeSearch, MSExchangeServiceHost                           , MSExchangeThrottling, MSExchangeTransportLogSearch, W3Svc, WinRM} ServicesNotRunning      : {}  Role                    : Client Access Server Role RequiredServicesRunning : True ServicesRunning         : {IISAdmin, MSExchangeAB, MSExchangeADTopology, MSExchangeFBA, MSExchangeFDS, MSExchangeMailbo                           xReplication, MSExchangeProtectedServiceHost, MSExchangeRPC, MSExchangeServiceHost, W3Svc, Wi                           nRM} ServicesNotRunning      : {}  Role                    : Hub Transport Server Role RequiredServicesRunning : True ServicesRunning         : {IISAdmin, MSExchangeADTopology, MSExchangeEdgeSync, MSExchangeServiceHost, MSExchangeTranspo                           rt, MSExchangeTransportLogSearch, W3Svc, WinRM} ServicesNotRunning      : {}

As you can see that is a lot of useful information. But whenever possible I like to see just the minimum relevant information for my servers. In the case of Test-ServiceHealth the RequiredServicesRunning result is the thing I am most interested in.

So in this case I could run the following command to see just that information:

[PS] C:\>Test-ServiceHealth br-ex2010-mb | ft Role,RequiredServicesRunning -auto  Role                      RequiredServicesRunning ----                      ----------------------- Mailbox Server Role                          True Client Access Server Role                    True Hub Transport Server Role                    True

Much better.

Now suppose I wanted to run that for all of my Exchange servers. I could do that with the following command:

[PS] C:\>Get-ExchangeServer | Test-ServiceHealth | ft Role,RequiredServicesRunning -auto  Role                      RequiredServicesRunning ----                      ----------------------- Client Access Server Role                    True Hub Transport Server Role                    True Client Access Server Role                    True Hub Transport Server Role                    True Mailbox Server Role                         False Mailbox Server Role                          True Client Access Server Role                    True Hub Transport Server Role                    True Mailbox Server Role                          True Client Access Server Role                    True Hub Transport Server Role                    True

Interesting, especially the one that failed the test for the Mailbox server role. But in that output I can't tell which server failed.

Let's try this instead:

[PS] C:\>$servers = Get-ExchangeServer [PS] C:\>foreach ($server in $servers) { >> Write-Host "Checking" $server.name >> Test-ServiceHealth $server | ft Role,RequiredServicesRunning -auto >> } >>

Now we get output that is a little more useful, and tells me which server failed the test.

Checking HO-EX2010-CAHT1  Role                      RequiredServicesRunning ----                      ----------------------- Client Access Server Role                    True Hub Transport Server Role                    True  Checking HO-EX2010-CAHT2  Role                      RequiredServicesRunning ----                      ----------------------- Client Access Server Role                    True Hub Transport Server Role                    True  Checking HO-EX2010-MB1  Role                RequiredServicesRunning ----                ----------------------- Mailbox Server Role                   False  Checking HO-EX2010-MB2  Role                RequiredServicesRunning ----                ----------------------- Mailbox Server Role                    True  Checking BR-EX2010-CAHT  Role                      RequiredServicesRunning ----                      ----------------------- Client Access Server Role                    True Hub Transport Server Role                    True  Checking BR-EX2010-MB  Role                      RequiredServicesRunning ----                      ----------------------- Mailbox Server Role                          True Client Access Server Role                    True Hub Transport Server Role                    True

But it still isn't quite enough, so let's wrap this up into a handy script that will do the following:

  • Run Test-SystemHealth for all of the Exchange servers in the organization
  • Tell me which servers passed the test
  • Tell me which servers failed the test, and why

Here is the script code that will perform those steps.

#Get the list of Exchange servers in the organization $servers = Get-ExchangeServer  #Loop through each server ForEach ($server in $servers) { 	Write-Host -ForegroundColor White "---------- Testing" $server  	#Initialize an array object for the Test-ServiceHealth results 	[array]$servicehealth = @()  	#Run Test-ServiceHealth 	$servicehealth = Test-ServiceHealth $server  	#Output the results 	ForEach($serverrole in $servicehealth) 	{ 		If ($serverrole.RequiredServicesRunning -eq $true) 		{ 			Write-Host $serverrole.Role -NoNewline; Write-Host -ForegroundColor Green "Pass" 		} 		Else 		{ 			Write-Host $serverrole.Role -nonewline; Write-Host -ForegroundColor Red "Fail" 			[array]$notrunning = @() 			$notrunning = $serverrole.ServicesNotRunning 			ForEach ($svc in $notrunning) 			{ 				$alertservices += $svc 			} 			Write-Host $serverrole.Role "Services not running:" 			ForEach ($al in $alertservices) 				{ 					Write-Host -ForegroundColor Red `t$al 				} 		} 	} }

The output from running the script will look something like this.

You can now see at a glance which servers have passed the test, which ones failed, and which services aren't running for the servers that failed.

Email Fundamentals: How to Send Email via Telnet

This is one of the essential troubleshooting tricks that an Exchange administrator needs to know, sending an email using Telnet from the command line.

Let's say you've just configured a relay connector and want to test it from the server that you wish to allow relay from before you let that server's owner know that it is all set up for them. Or perhaps you want to quickly test whether a another email server on the internet is accepting mail from your network.

For just about any scenario where you want to quickly test SMTP knowing this method is very useful.

Note: this technique requires the Telnet client to be installed on the computer you're running the test from. For Windows XP and Windows Server 2003 it will already be installed, but Windows 7 and Windows Server 2008 need to install it first.

Installing the Telnet Client for Windows 7

To install the Telnet client on a Windows 7 computer use these steps.

  1. Open the Control Panel
  2. Click on Programs
  3. Click on Turns Windows Features on or off
  4. Scroll down the list until you see Telnet Client, and tick that box
  5. Click OK and close the Control Panel

Installing the Telnet Client for Windows Server 2008

To install the Telnet client on a Windows Server 2008 computer open a command prompt and run the following command.

C:\>servermanagercmd -i telnet-client .........  Start Installation... [Installation] Succeeded: [Telnet Client].  Success: Installation succeeded.

Installing the Telnet Client for Windows Server 2008 R2

To install the Telnet client on a Windows Server 2008 R2 computer open a PowerShell window and run the following command.

PS C:\> Import-Module servermanager PS C:\> Add-WindowsFeature telnet-client  Success Restart Needed Exit Code Feature Result ------- -------------- --------- -------------- True    No             Success   {Telnet Client}

Sending Email from the Command Line via Telnet

Open a command prompt and use Telnet to connect to the remote email server on port 25.

C:\>telnet esp-ho-ex2010a 25

If Telnet is able to connect to the remote server you should see its welcome banner.

220 ESP-HO-EX2010A.exchangeserverpro.net Microsoft ESMTP MAIL Service ready at T ue, 9 Aug 2011 22:00:04 +1000

The first command to send is the HELO command. Some email servers will accept HELO on its own, others will require you to also provide a host or domain name along with it.

helo test.com 250 ESP-HO-EX2010A.exchangeserverpro.net Hello [10.0.1.11]

Next use the MAIL FROM command to tell the remote server who the email is from.

mail from: test@test.com 250 2.1.0 Sender OK

Now use the RCPT TO command to tell the remote server who to deliver the email to.

rcpt to: alan.reid@exchangeserverpro.net 250 2.1.5 Recipient OK

The final step for the bare minimum set of commands is the DATA command.

data 354 Start mail input; end with .

If you just want to send a blank message type a period "." and press enter. Otherwise you can set a subject line for the message if you like. Use SUBJECT and then type your subject line, and press enter.

subject: this is a test message

Type any text you want to include with the message, press enter, and then finally type a period "." and press enter to send the email.

sending a test message via telnet . 250 2.6.0  [InternalId=320] Queued mail for delivery

If the message was queued for delivery then it has been accepted by the server. If this is an Exchange server that you control then you can use message tracking to troubleshoot further if the message doesn't make it to the inbox that you were expecting.

Type the QUIT command to terminate the connection when you're done.

SMTP Status Codes

You may notice along the way that after typing commands you see responses from the server starting with "250″.

250 is a good thing, and there are a lot of other SMTP status codes you'll encounter the more you use this technique. For example an email server may deny your attempt to relay mail between two domains.

550 5.7.1 Unable to relay

Or you may encounter an email server that is explicitly blocking email from your domain.

554 5.1.0 Sender denied

There are a lot of different scenarios you might encounter here, and thankfully the SMTP status codes will help you troubleshoot them.

Now that you understand how to send email using Telnet and the command line I hope you find this technique very useful in the future.