4 Dec 2013

Optimize Virtual Environment

Although memory is often referred to as the most important hardware resource in a virtual data center, it is typically storage that has the biggest impact on virtual machine performance. Microsoft Hyper-V is extremely flexible with regard to the types of storage it can use, but administrators must be aware of a number of feature-related limitations and requirements for support. This article is intended to familiarize you with various Hyper-V storage best practices.
Minimizing virtual machine sprawl

One issue that virtualization administrators must routinely deal with is virtual machine (VM) sprawl. Microsoft's licensing policy for Windows Server 2012 Datacenter Edition, and tools such as System Center Virtual Machine Manager, have made it too easy to create VMs; if left unchecked, VMs can proliferate at a staggering rate.

The problem of VM sprawl is most often dealt with by placing limits on VM creation or setting policies to automatically expire aging virtual machines. However, it is also important to consider the impact VM sprawl can have on your storage infrastructure.

As more and more VMs are created, storage consumption can become an issue. More often however, resource contention is the bigger problem. Virtual hard disks often reside on a common volume or on a common storage pool, which means the virtual hard disks must compete for IOPS.

Although there isn't a universally applicable, cheap and easy solution to the problem of storage resource contention, there are a number of different mechanisms Hyper-V administrators can use to get a handle on the problem.
Fighting resource contention with dedupe

One of the best tools for reducing storage IOPS is file system deduplication. However, there are some important limitations that must be considered.

Microsoft introduced native file system deduplication in Windows Server 2012. Although this feature at first seemed promising, it had two major limitations: Native deduplication was not compatible with the new ReFS file system; and native deduplication was not supported for volumes containing virtual hard disks attached to a running virtual machine.

Microsoft did some more work on the deduplication feature in Windows Server 2012 R2 and now you can deduplicate a volume containing virtual hard disks that are being actively used. But there is one major caveat: This type of deduplication is only supported for virtual desktops, not virtual servers.

Deduplication can reduce IOPS and improve performance for Hyper-V virtual servers, but the only way to realize these benefits in a supported manner is to make use of hardware-level deduplication that is completely transparent to the Hyper-V host and any guest operating systems.

Managing QoS for effective storage I/O

Another tool for reducing the problem of storage I/O contention is a new Windows Server 2012 R2 feature called Quality of Service Management (formerly known as Storage QoS). This feature allows you to reserve storage IOPS for a virtual hard disk by specifying a minimum number of IOPS. IOPS occur in 8 KB increments. Similarly, you can cap a virtual hard disk's I/O operations by specifying a maximum number of allowed IOPS.

The Quality of Service Management feature is set on a per-virtual-hard-disk basis rather than a per-VM basis. This allows you to granularly apply Quality of Service Management policies in a way that gets the best possible performance from your available IOPS.
Considerations for Windows Storage Spaces

Microsoft introduced Windows Storage Spaces in Windows Server 2012 as a way of abstracting physical storage into a pool of storage resources. You can create virtual disks on top of a storage pool without having to worry about physical storage allocations.

Microsoft expanded the Windows Storage Spaces feature in Windows Server 2012 R2 by introducing new features such as three-way mirroring and storage tiering. You can implement the tiered storage feature on a per-virtual-hard-disk basis and allow "hot blocks" to be dynamically moved to a solid-state drive (SSD)-based storage tier so they can be read with the best possible efficiency.

The tiered storage feature greatly improves VM performance, but there are some limitations. The most pressing one is that storage tiers can only be used with mirrored virtual hard disks or simple virtual disks. Storage tiers cannot be used with parity disks, even though this was allowed in the preview release.

If you are planning to use tiered storage with a mirrored volume, then Windows requires the number of SSDs in the storage pool to match the number of mirrored disks. For example, if you are creating a three-way mirror then you will need three SSDs.

When you create a virtual hard disk that uses storage tiers, you are able to specify the amount of SSD space you wish to allocate to the fast tier. It is a good idea to estimate how much space you will need and then add at least 1 GB to that estimate. The reason for this is that if sufficient space is available, then Windows will use 1 GB of the fast tier as a write-back cache. This cache helps smooth out write operations (thereby improving write performance) by taking 1 GB of space away from your fast tier. If you account for this loss up front, you can allocate enough space to accommodate both the write-back cache and the hot storage blocks.

ReFS limitations

In Windows Server 2012, Microsoft introduced the Resilient File System (ReFS) as a next-generation replacement for the aging NTFS file system, which also exists in Windows Server 2012 R2. Hyper-V administrators must consider whether to provision VMs with ReFS volumes or NTFS volumes.

If you are running Hyper-V on Windows Server 2012, then it is best to avoid using the ReFS file system, which has a number of limitations. Perhaps the most significant of these (at least for virtualization administrators) is that ReFS is not supported for use with Cluster Shared Volumes.

In Windows Server 2012 R2, Microsoft supports the use of ReFS on Cluster Shared Volumes, but there are still limitations that need to be taken into account. First, choosing a file system is a semi-permanent operation. There is no option to convert a volume from NTFS to ReFS or vice versa.

Also, a number of features that exist in NTFS do not exist in ReFS. Microsoft has hinted that such features might be added in the future, but for right now, here is a list of what is missing:

    File-based compression (deduplication)
    Disk quotas
    Object identifiers
    Encrypted File System
    Named streams
    Transactions
    Hard links
    Extended Attributes

With so many features missing, why would anyone use ReFS? There are two reasons: ReFS is really good at maintaining data integrity and preventing bit rot, and it is a good choice when large quantities of data need to be stored. The file system has a theoretical size limit of 1 yottabyte.

If you do decide to use the ReFS file system on a volume containing Hyper-V VHD or VHDX files, then you will have to disable the integrity bit for those virtual hard disks. Hyper-V automatically disables the integrity bit for any newly created virtual hard disks, but if there are any virtual hard disks that were created on an NTFS volume and then moved to an ReFS volume, the integrity bit for those virtual hard disks need to be disabled manually. Otherwise, Hyper-V will display a series of error messages when you attempt to start the VM.

You can only disable the integrity bit through PowerShell. You can verify the status of the integrity bit by using the following command:

Get-Item <virtual hard disk name> | Get-FileIntegrity

If you need to disable the integrity bit, do so with this command:

Get-Item <virtual hard disk name> | Set-FileIntegrity –Enable $False
Best practices for storage connectivity

Hyper-V is extremely flexible with regard to the types of storage hardware that can be used. It supports direct-attached storage, iSCSI, Fibre Channel (FC), virtual FC and more. However, the way that storage connectivity is established can impact storage performance, as well as your ability to back up your data.

There is an old saying, "Just because you can do something doesn't necessarily mean that you should." In the world of Hyper-V, this applies especially well to the use of pass-through disks. Pass-through disks allow Hyper-V VMs to be configured to connect directly to physical disks rather than using a virtual hard disk.

The problem with using pass-through disks is that they are invisible to the Hyper-V VSS Writer. This means backup applications that rely on the Hyper-V VSS Writer are unable to make file, folder or application-consistent backups of volumes residing on pass-through disks without forcing the VM into a saved state. It is worth noting that this limitation does not apply to virtual FC connectivity.

Another Hyper-V storage best practice for connectivity is that whenever possible, establish iSCSI connectivity from the host operating system rather than doing it inside the VM. The reason for this is that depending on a number of factors (such as the Hyper-V version, the guest operating system and the Integration Service usage), storage performance can suffer if iSCSI connectivity is initiated from within the VM due to a lack of support for jumbo frames.

Troubleshooting VMware performance

A prerequisite to troubleshooting VMware storage performance is confirming whether storage or its infrastructure is the problem. While there are many sophisticated tools available to monitor the virtual environment, a simple and free way to make this determination is to monitor host CPU and virtual machine (VM) CPU utilization over time. Essentially, you want to know what the utilization of the CPU resource is when the performance problem is most noticeable. If the utilization is above 65%, it's more than likely that the performance problem can be best solved by upgrading the host, allocating more CPU resource to that particular VM or moving the VM to another host.

A simple way to rule out a CPU-related performance issue is to migrate the VM to a more powerful host with more memory, if possible. Assuming the alternate host is on the same shared storage infrastructure, a repeat in performance loss on a second host certainly begins to make storage performance a top candidate for resolving the issue.

One of the prime benefits that virtualization offers is its role in isolating performance problems. In the past, moving an application to another host meant acquiring server hardware, installing the operating system and application, and then migrating users. With virtualization, a simple vMotion can provide a lot of information in the troubleshooting process.

Targeting the storage network

Once a performance problem has been better isolated to the storage infrastructure, the next step is to determine where it's occurring in that infrastructure. Conventional wisdom (and storage vendors) says to "throw hardware" at the problem and buy more disk drives, solid-state drives (SSDs) or a more powerful storage controller. While a faster storage device may be in order, IT planners should first look at the storage network between the VMware hosts and the storage system. If a network problem exists, it doesn't matter how fast the storage devices in the system are.

A simple way to determine a network performance issue is to look at disk performance. Assuming CPU utilization is low, a storage device performance issue should show a relatively steady state of IOPS, which means disk I/O has hit a wall. Occasional high spikes or sporadic spikes in disk I/O performance means the device and storage system have performance to spare, but data isn't getting to them fast enough. In other words, there is a problem in the network.

IT professionals tend to focus on overall bandwidth as the biggest area of contention in the storage network -- for example, when moving from a 1 Gigabit Ethernet (GbE) environment to 10 GbE, or from 4 Gb Fibre Channel (FC) to 8 Gb FC. While an increase in bandwidth can improve performance, it's not always the main culprit. Other problem areas, like the quality and capabilities of the network card or the configuration of the network switch, should also be considered at the outset. Resolving issues at these levels is often far less expensive.

Network interface cards (NICs), whether they're FC- or Internet Protocol-based, are typically shared across multiple VMs within a host. Even multi-port cards are typically aggregated and shared. If a particular VM has a performance problem, dedicating that VM to its own port on a card -- or even its own card -- may be all that's needed to resolve the performance problem. If the decision is made to upgrade the NIC to a faster speed, look for cards where specific VM traffic can be isolated or provided a certain Quality of Service.

You can also upgrade the NIC without upgrading the rest of the network. While it may seem counterintuitive, placing a 16 Gb FC card into an 8 Gb FC network does two things: It lays the foundation for faster storage infrastructures, and it improves performance even over the old cabling. This is because the processing capabilities of the interface card become more robust with each generation. To move data into and out of a NIC requires processing power, so the faster this can occur, the better the performance of that card.

Switches can get overwhelmed

The second area of the storage network to explore is the switch. Just like a card, a switch can be overwhelmed by the amount of traffic it has to handle; many switches on the market weren't even designed for a 100% I/O load. For example, some switch designers may have counted on some connections not needing full bandwidth at all times. So while a switch may have 48 ports, it can't sustain full bandwidth to all ports at the same time. In fairness, in the pre-virtualization days, this was a safe practice. In the modern virtualized infrastructure, however, the thought of idle physical hosts is no longer practical.

Another common problem in switch configuration is inter-switch links. It's not uncommon as switch infrastructures get upgraded to find inter-switch connections hard set to their prior network speed. This configuration error essentially locks switch performance to its older performance level.

Looking for trouble in the storage controller

If disk performance measurements show a relatively steady state and CPU utilization is low, then it's more than likely that there's a problem with the storage system. Again, most tuning efforts tend to focus on the storage device, but the storage controller should be ruled out first. The modern storage controller is responsible for getting data into and out of the system, providing features like snapshots and managing RAID. In addition, some systems now perform even more sophisticated activities, such as data tiering between SSDs and hard disk drives (HDDs).

There are two parts of the storage controller that must be ruled out: the network interconnect between the controller and the drives, and the processing resource. Most storage systems will provide a GUI interface that will display the relevant statistics. It's important to monitor them during the problem period to determine if either one of these are the source of the problem. In the past, these two resources were seldom a concern, but in a virtualized data center, it's not uncommon. Also, if and when SSDs are installed in the storage system, it's important to recheck those resources to ensure they're not blocking the SSD from reaching its full potential.

Analyzing the storage device

After all this triage is done, the storage device can finally be analyzed. It's important to note that most storage tuning efforts start here, when in actuality this is where they should end. Having a fast storage device without an optimized infrastructure is a waste of resources. That said, the above modifications (host CPU, storage network and storage controller), while not optimal, will often prove to be acceptable. The easiest way to confirm a disk I/O performance problem is when your measurement tool shows a consistent performance result. For example, if IOPS is consistently reporting in the same range while CPU and network utilization are low.

The fix for device-based performance problems is typically to add additional drives or to migrate to SSD. In the modern era, a move to SSD is almost always more beneficial, providing a better performance improvement for less expense. However, before shifting to more or faster drives, IT professionals should also look at how the VM disk files are distributed. Too many on a single volume can be problematic; moving them to different HDD volumes can help. In the end, SSD should also solve the problem.

Tuning the VMware environment is a step-by-step process. Before you upgrade to high-storage devices, you should go through the above process to ensure your VMware environment will see the maximum benefit from your investment.

Get ready for the 12 Gbps SAS drive

The rollout of a 12 Gbps SAS drive and other technology will mean performance improvements and new management capabilities. Marty Czekalski, president of the SCSI Trade Association, discussed the impact that 12 Gbps SAS will have on IT organizations. Czekalski also does ecosystem development for interface technologies and protocols, and works with standards organizations in his position as manager of the emerging technology program at hard disk drive vendor Seagate Technology LLC.

Where does the rollout of 12 Gbps SAS drive technology stand?

Marty Czekalski: It's just starting up the ramp now, and we've been doing plugfests like the one [from Oct. 21-26] at the University of New Hampshire. We've done a lot of work in wringing out all the bugs. The plugfest went very smoothly, so we're looking forward to a relatively event-free rollout. Our first 12 Gb plugfest was held last year, where people brought their prototypes, and it's usually about 12 to 18 months before end-user shipments start.

Usually, the first place those show up is [in] add-in cards and servers, which is where they're showing up now. If you have a specific need for the performance today, you can get 12 [Gbps] SAS host bus adapters, and there are some 12 [Gbps] SAS SSDs [solid-state drives]. You'll see over the next several months [that] the different OEMs will start offering these as add-ons to their servers.

Today, the servers are shipping typically with 6 [Gbps SAS] on the motherboard. If people want the extra performance, they buy an add-in card for 12 [Gbps]. You'll start to see 12 [Gbps] SAS RAID controllers down on the motherboard starting midyear next year, with the new server shipments typically as a standard feature.

Are there other ways to implement 12 Gbps SAS drives?

Czekalski: There's a lot of different ways you can implement it. As I said, add-in cards. It'll be down on the motherboard, and you'll be able to plug in 12 Gbps SSDs or [hard disk drives] HDDs. You'll have external storage systems that are connected with 12 [Gbps] SAS as well as Fibre Channel [FC] subsystems that'll be FC on the front end and the back ends will be 12 Gbps SAS to the actual storage devices. People who are rolling out FC or network-connected storage systems are already migrating their back ends to 12 [Gbps] SAS so they can scale out those storage systems on the back end more effectively and into larger configurations.

What benefits will enterprise IT users get from 12 Gbps SAS drive technology?

Czekalski: It doubles the user transfer rate. The other thing that's coming into play now is more of the host bus adapters [HBAs] will be using the Mini-SAS HD connector, which is a managed connector. It allows a single HBA to accept different kinds of cables. So, you can go with a passive cable, say, up to six or eight meters. You could use an active copper cable by just changing the cable. You can go up to 20 meters with that. Or, you can even go with optical cables up to 100 meters.

In addition, these are managed cables with that connector, so when it's plugged into the system, the system actually knows what kind of cable, what kind of distance it's going. The system can adapt its signaling to optimize it for that particular type of cable. If there's a cable problem for some reason, and the system detects it, it can actually say cable number x, part number y needs replacement. It becomes easier to manage from an IT standpoint.

How was support for that capability built into the system?

Czekalski: It's built right into the connector and cable. The connector on the host bus adapter or on the server is the same in all cases. It's the same low-cost SAS RAID controller or HBA. If you need to go extra distances, you buy a cable that's appropriate. For short cables that are passive, they're very inexpensive. If you need to go 100 meters, you buy an active optical cable, and you plug it in. So, the active components are actually in the connector housing that's on the cable. And in addition to just having the active components, there's also an EEPROM [Electrically Erasable Programmable Read-Only Memory] in there that the system can read that tells exactly what kind of cable it is, its characteristics, part numbers and a bunch of different things.

How do systems based on 6 Gbps SAS work now?

Czekalski: The 6 Gb with the original Mini-SAS connector didn't have any manageability. It didn't have the extra pins to be able to read what kind of cable it was. You had your basic cables for doing six to 10 meters, and then there were some specialty cables and systems built that could take an active copper cable. But there was no way for the system to know exactly what kind of cable was plugged in. With the Mini-SAS HD, there are extra pins for the purposes of providing power to the connector for the active components in both the copper and optical, as well as power to the EEPROM that's in there so the data can be read out.

How will 12 Gbps SAS SSDs stack up performance-wise against PCI Express (PCIe)-based SSDs?

Czekalski: I think you're going to see less extremes and performance differences. And keep in mind that SAS SSDs have different features than a PCIe SSD. The SAS SSDs are dual-ported and connected into a fault-tolerant domain, and all the software is already there and works for failover and high availability [HA]. That feature isn't yet there for PCIe. Yes, they designed the connectors and stuff so that could be done, but that whole ecosystem for being able to do the HA stuff doesn't exist today for PCIe. The other thing that doesn't exist today is the same kind of hot-plug model in PCIe. If you were to go over to most of these PCIe devices and unplug it, you're going to get a blue screen as opposed to a SAS device. SAS is hot-pluggable. You can do surprise plugs and unplugs, and the system doesn't mind it because it's a storage interface that was designed for that. PCIe wasn't originally designed to be hot plugged.

Will users see a substantial performance improvement with SAS hard disk drives?

Czekalski: You will see improvements there with 12 Gb, particularly on 12 Gb HDDs that are hybrid drives that have some flash embedded in them, because the flash can now run at the line rate directly. So, your reads that are coming out of the flash cache on a hybrid HDD will run at the line rate. You'll also get more scalability even if you're just running a traditional SAS HDD on 12 Gb. You can put more of them on the same bus without getting contention. So, you can create large configurations, and you reduce your number of HBAs. You can reduce the number of cables and other things. So, it actually reduces overall system cost and complexity while improving the performance.

10 Nov 2013

SkyDrive on Windows 8.1

Microsoft integrated its SkyDrive file synchronization and hosting service into the Window 8.1 operating system in a way that it is enabled automatically for users signing in to the system with a Microsoft Account.

Local account users on the other hand -- those users who prefer to not use a Microsoft Account cannot use the implementation and are also not allowed to make use of the official SkyDrive application as it simply won't install on Windows 8.1.

So what options do those users have if they want to access files on SkyDrive, provided that this is their file syncing service of choice?

They can access the data in the web browser, but that is everything but comfortable. While it may be okay for accessing the occasional file, adding, editing or removing files is everything but.

There is however a way to set up SkyDrive on Windows 8.1 if you use a local account, or if you have disabled the integrated version while using a Microsoft Account.

SkyDrive in Windows 8.1

To enable access to SkyDrive on Windows 8.1, and other Windows operating systems for that matter, do the following:

  • Load the official SkyDrive website in your web browser and sign in to the service if you have not done so already.
  • Right-click on Files in the left sidebar and select Copy Link from the context menu.
  • Paste the link into a text document or into the browser's address bar, and copy the cid number at the end of the link, e.g. https://skydrive.live.com/#cid=xxxxxxxxxxxxxxxxwhere xxx is the cid
  • Open File Explorer in Windows 8.1.
  • Select This PC from the left sidebar.
  • Select Map Network Drive from the ribbon UI.
  • Type https://d.docs.live.net/xxxxxxxxxxxxxx as the folder and replace the xxx line with the cid that you copied before.
  • Select a drive letter for SkyDrive.

skydrive local account

  • Click on Finish and wait some time. The message "attempting to connect to" appears. It takes some time, but you will eventually be asked to enter your SkyDrive username and password.

skydrive sign-in

  • Type the data in and wait again. If you do not want to enter the data in every session, check the "remember my credentials" box.
  • Note: If you use two-factor authentication, you need to type in an app password here that you can create under Security Info on your Microsoft Account page on the Internet.
  • If everything goes alright, you should now see the new SkyDrive folder under This PC in File Explorer.

When you click on it, all of your folders and files become available on Windows 8.1.  This works on other Windows operating systems as well. (via Flgoo)

Closing Words

While you do get access to files hosted on SkyDrive directly in the operating system, you cannot make use of other features that Microsoft implemented on Windows 8.1.

Uninstall Windows 8.1

Windows 8.1 is a pretty good operating-system update. But it's also an operating-system update meaning that it can get tripped up by hidden software conflicts that don't arise when upgrading individual apps.

Unfortunately, Win 8.1 is also much harder to undo than other operating-system updates. Contrary to what its "point release" number might suggest, 8.1 is not some minor update you can roll back through the Windows Update control panel. And it's more difficult to roll back through the other usual mechanism in Windows, a system-recovery process.

A Microsoft frequently-asked-questions page about Win 8.1 explains this in conditional language that should give a reader pause: "If your PC came with Windows 8 you might be able to restore it back to Windows 8 by refreshing your PC."

Should that work, it will allow the most orderly retreat possible. Win 8's underrated "refresh" option will put a clean copy of the operating system in place, leaving your data intact but only reinstalling apps that came bundled on the computer or were obtained through the Windows Store.

To use this option, tap or click the bottom-right corner of the desktop (or swipe in from the right edge of the Start screen), select the gear-shaped Settings icon, and then select "Change PC settings."

In that screen, click or tap "Update and recovery," choose the Recovery option and proceed with a refresh from there. The computer will use the hard drive's system-recovery partition to put things back as they were when you took the computer out of the box, plus your own data.

If, however, you upgraded from Windows 7 or an older version to Windows 8 and then added 8.1 using Microsoft's free Windows Store download, the above process is out of the question.

As Microsoft's FAQ spells out, post-8.1 "you won't be able to use the recovery partition on your PC to go back to your previous version of Windows." If you hadn't earlier thought to create a recovery USB flash drive from that partition, you're most likely stuck doing a clean install of Windows. And that in turn usually requires beseeching or paying your PC's vendor for a Windows disc, because most computers don't ship with a separate system DVD.

ZDNet writer Ed Bott, an author of multiple Windows books, noted that Windows 7 includes the option to make a full "disk image" backup of the entire system. "If your reader had the foresight to make one of those image backups before doing the upgrade, they can be back exactly where they left off (minus any files that were changed between now and when the image was snapped)."

I can confirm that disk-image backups work, and that too many users don't think to make one until approximately one hour too late.

As for what could make a Win 8.1 update go bad, complaints I've gotten from readers generally focus on drivers the background bits of software that let the system talk to components like video cards and other apps that haven't been updated to work correctly in Win 8.1.

That's an old problem, and so is the most likely solution waiting for the software in question to be updated for 8.1. Wrote Bott: "I would try to solve the driver problem first if I could. That's going to lead to the best outcome and the least amount of heartache."

At least going back remains an option in Windows. The rewind button remains intact, even if it's harder to access. (OS X Mavericks also lets you revert to an older version through the Time Machine backup app.) Apple's iOS 7, however, can't be uninstalled at all.

Create a Windows 8 recovery drive

Unlike earlier versions of Windows, 8 and 8.1 include simple, quick tools to create USB system-recovery drives. You can then use one to repair your system or restore it to factory condition, even if Windows itself has become unbootable.

To do this, plug in a reasonably large and empty USB drive Microsoft says you'll need from 3 to 6 gigabytes switch to Win 8's Apps view, and type "create." The first result should be "Create a recovery drive."

Follow the prompts there; if you choose the option to copy the computer's recovery partition, you'll also be able to restore the machine to factory shape from this USB drive.

7 Nov 2013

How Replication Works

Once Replica is enabled, the source host starts to maintain a HRL (Hyper-V Replica Log file) for the VHDs.  Every 1 write by the VM = 1 write to VHD and 1 write to the HRL.  Ideally, and this depends on bandwidth availability, this log file is replayed to the replica VHD on the replica host every 5 minutes.  This is not configurable.  Some people are going to see the VSS snapshot (more later) timings and get confused by this, but the HRL replay should happen every 5 minutes, no matter what.

The HRL replay mechanism is actually quite clever; it replays the log file in reverse order, and this allows it only to store the latest writes.  In other words, it is asynchronous (able to deal with long distances and high latency by write in site A and later write in site B) and it replicates just the changes.
 
Replication or replay of the HRL will normally take place every 5 minutes.  That means if a source site goes offline then you'll lose anywhere from 1 second to nearly 10 minutes of data.

Normally take place every 5 minutes.  Sometimes the bandwidth won't be there.  Hyper-V Replica can tolerate this.  After 5 minutes, if the replay hasn't happened then you get an alert.  The HRL replay will have another 25 minutes (up to 30 completely including the 5) to complete before going into a failed state where human intervention will be required.  This now means that with replication working, a business could lose between 1 second and nearly 1 hour of data.

Most organisations would actually be very happy with this. Novices to DR will proclaim that they want 0 data loss. OK; that is achievable with EUR100,000 SANs and dark fibre networks over short distances. Once the budget face smack has been dealt, Hyper-V Replica becomes very, very attractive.

That's the Recovery Point Objective (RPO – amount of time/data lost) dealt with.  What about the Recovery Time Objective (RTO – how long it takes to recover)?  Hyper-V Replica does not have a heartbeat.  There is not automatic failover.  There's a good reason for this.  Replica is designed for commercially available broadband that is used by SMEs.  This is often phone network based and these networks have brief outages.  The last thing an SME needs is for their VMs to automatically come online in the DR site during one of these 10 minute outages.  Enterprises avoid this split brain by using witness sites and an independent triangle of WAN connections.  Fantastic, but well out of the reach of the SME.  Therefore, Replica will require manual failover of VMs in the DR site, either by the SME's employees or by a NOC engineer in the hosting company.  You could simplify/orchestrate this using PowerShell or System Center Orchestrator.  The RTO will be short but have implementation specific variables: how long does it take to start up your VMs and for their guest operating systems/applications to start?  How long will it take for you to get your VDI/RDS session hosts (for remote access to applications) up, running and accepting user connections?  I'd reckon this should be very quick, and much better with the 4-24 hours that many enterprises aim for.  I'm chuckling as I type this; the Hyper-V group is giving SMEs a better DR solution than most of the Fortune 1000's can realistically achieve with oodles of money to spend on networks and storage replication, regardless of virtualisation products.

A common question I expect: there is no Hyper-V integration component for Replica.  This mechanism works at the storage level, where Hyper-V is intercepting and logging storage activity.

Replica and Hyper-V Clusters

Hyper-V Replica works with clusters.  In fact you can do the following replications:
•Standalone host to cluster
•Cluster to cluster
•Cluster to standalone host

The tricky thing is the configuration replication and smooth delegation of replication (even with Live Migration and failover) of HA VMs on a cluster.  How can this be done?  You can enable a HA role called a Hyper-V Replica Broker on a cluster (once only).  This is where you can configure replication, authentication, etc, and the Broker replicates this data out to cluster nodes.  Replica settings for VMs will travel with them, and the broker ensures smooth replication from that point on.

Configuring Hyper-V Replica

Here the fundamentals:

On the replica host/cluster, you need to enable Hyper-V Replica.  Here you can control what hosts (or all) can replicate to this host/cluster.  You can do things like have one storage path for all replicas, or creating individual policies based on source FQDN such as storage paths or enabling/pausing/disabling replication.

You do not need to enable Hyper-V Replica on the source host.  Instead, you configure replication for each required VM.  This includes things like:
  • Authentication: HTTP (Kerberos) within the AD forest, or HTTPS (destination provided SSL certificate) for inter-forest (or hosted) replication.
  • Select VHDs to replicate
  • Destination
  • Compressing data transfer: with a CPU cost for the source host.
  • Enable VSS once per hour: for apps requiring consistency – not normally required because of the logging nature of Replica and it does cause additional load on the source host
  • Configure the number of replicas to retain on the destination host/cluster: Hyper-V Replica will automatically retain X historical copies of a VM on the destination site.  These are actually Hyper-V snapshots on the destination copy of the VM that are automatically created/merged (remember we have hot-merge of the AVHD in Windows 8) with the obvious cost of storage.  There is some question here regarding application support of Hyper-V snapshots and this feature.

Initial Replication Method

I've worked in the online backup business before and know how difficult the first copy over the wire is.  The SME may have small changes to replicate but might have TBs of data to copy on the first synchronisation.  How do you get that data over the wire?
  • Over-the-wire copy: fine for a LAN, if you have lots of bandwidth to burn, or if you like being screamed at by the boss/customer.  You can schedule this to start at a certain time.
  • Offline media: You can copy the source VMs to some offline media, and import it to the replica site.  Please remember to encrypt this media in case it is stolen/lost (BitLocker-To-Go), and then erase (not format) it afterwards (DBAN).  There might be scope for an R2/Windows 9 release to include this as part of a process wizard.  I see this being the primary method that will be used.  Be careful: there is no time out for this option.  The HRL on the source site will grow and grow until the process is completed (at the destination site by importing the offline copy).  You can delete the HRLs without losing data it is not like a Hyper-V snapshot (checkpoint) AVHD.
  • Use a seed VM on the destination site: Be very very careful with this option.  I really see it as being a great one for causing calls to MSFT product support.  This is intended for when you can restore a copy of the VM in the DR site, and it will be used in a differencing mechanism where the differences will be merged to create the synch.  This is not to be used with a template or similar VMs.  It is meant to be used with a restored copy of the same VM with the same VM ID.  You have been warned.

And that's it.  Check out the social media and you'll see how easy people are saying Hyper-V Replica is to set up and use.  All you need to do now is check out the status of Hyper-V Replica in the Hyper-V Management Console, Event Viewer (Hyper-V Replica log data using the Microsoft-Windows-Hyper-V-VMMS\Admin log), and maybe even monitor it when there's an updated management pack for System Center Operations Manager.

Failover

I said earlier that failover is manual.  There are two scenarios:
  • Planned: You are either testing the invocation process or the original site is running but unavailable.  In this case, the VMs start in the DR site, there is guaranteed zero data loss, and the replication policy is reversed so that changes in the DR site are replicated to the now offline VMs in the primary site.
  • Unplanned: The primary site is assumed offline.  The VMs start in the DR site and replication is not reversed. In fact, the policy is broken.  To get back to the primary site, you will have to reconfigure replication.Can I Dispense With Backup?No, and I'm not saying that as the employee of a distributor that sells two competing backup products for this market.  Replication is just that, replication.  Even with the historical copies (Hyper-V snapshots) that can be retained on the destination site, we do not have a backup with any replication mechanism.  You must still do a backup, as I previously blogged, and you should have offsite storage of the backup.Many will continue to do off-site storage of tapes or USB disks.  If your disaster affects the area, e.g. a flood, then how exactly will that tape or USB disk get to your DR site if you need to restore data?  I'd suggest you look at backup replication, such as what you can get from DPM:
The Big Question: How Much Bandwidth Do I Need?
 
There's a sizing process that you will have to do.  Remember that once the initial synchronisation is done, only changes are replayed across the wire.  In fact, it's only the final resultant changes of the last 5 minutes that are replayed.  We can guestimate what this amount will be using approaches such as these:
  • Set up a proof of concept with a temporary Hyper-V host in the client site and monitor the link between the source and replica: There's some cost to this but it will be very accurate if monitored over a typical week.
  • Do some work with incremental backups: Incremental backups, taken over a day, show how much change is done to a VM in a day.
  • Maybe use some differencing tool: but this could have negative impacts.
Some traps to watch out for on the bandwidth side:
  • Asynchronous broadband (ADSL):  The customer claims to have an 8 Mbps line but in reality it is 7 Mbps down and 300kbps up.  It's the uplink that is the bottleneck because you are sending data up the wire.  Most SME's aren't going to need all that much.  My experience with online backup verifies that, especially if compression is turned on (will consume source host CPU).
  • How much bandwidth is actually available: monitor the customer's line to tell how much of the bandwidth is being consumed or not by existing services.  Just because they have a functional 500 kbps upload, it doesn't mean that they aren't already using it.

Suggestion
 
Hyper-V Replica works by intercepting writes to VHDs.  It has no idea of what's inside the files.  You can't just filter out the paging file.  So the excellent suggestion from the Hyper-V product group is to place the paging file of each VM onto a different VHD, e.g. a SCSI attached D drive.  Do not select this drive for replication.  When the VMs are failed over, they'll still function without the paging file, just not as well.  You can always add one after if the disaster is sustained.  The benefit is that you won't needlessly replicate paging file changes from the primary site to the DR.
 

Install Hyper-V R2

Installing Hyper-V R2 is very similar to installing a Core deployment of Windows Server 2008 R2. Without the familiar GUI and with a lower cumulative experience base in the community to draw upon, this can be a somewhat intimidating process. Fortunately, it really isn't difficult and a fully functional Hyper-V installation can be built in no more time than it would take to deploy any other new Windows Server. All you need is a little guidance and a little patience for using the command line.
Planning

As always, proper planning is critical to achieving a quick and successful deployment. Because this article is more of a how-to than a complete deployment guide, you are encouraged to read the entire guide from start to finish before doing anything. We are planning to release a very thorough document in the future.

Things to Remember

  • Microsoft usually has at least two ways to do any one thing. If you see a step here and you know of or prefer a different way, that's perfectly acceptable.
  • When working at the command or PowerShell prompt, the [TAB] key is your friend. You can navigate through deep directory structures and enter long file names with ease by keying in the first few letters and hitting [TAB] to let Windows figure it out. It will cycle through file names and directory names. In a PowerShell prompt, it will cycle through those and in-context commands or command switches. For instance, "CD \Pr[TAB]" will get Windows to suggest "CD \Program Files". Another press of [TAB] will have it suggest "CD \Program Files (x86)".

Initial Installation

To actually install Hyper-V is very simple. You'll need to acquire the DVD image from Microsoft and burn it to a disc. Assuming that your physical host is prepared (i.e., hard drives partitioned as desired), you simply boot to the DVD and follow the prompts. There really aren't any options to set or change during the installation phase.

Beginning Configuration

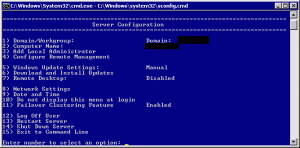
The first part of setting up your Hyper-V host is pretty much the same as setting up a machine running Windows Server Core. What's especially helpful is that "sconfig.cmd" will run automatically at startup so you'll be immediately presented with a simplistic way to configure your system. There is nothing here that can't be done at the command-line and you're free to investigate the contents of the sconfig.vbs file to see what's going on under the hood.

sconfig.cmd

sconfig.cmd

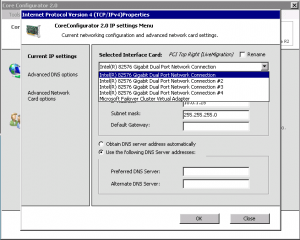
Start by renaming your server according to your company standards (option 2 on the sconfig menu). Once that has been done and the server has rebooted, configure the network card that you'll be using to manage the physical host with (option 8 on the sconfig menu). Hopefully, your server has multiple network adapters (optimally two for a standalone server and five for a clustered server). For the beginning portion, the only one you are required to configure is the management adapter. If you can't tell from looking at the sconfig menu which adapter is which, the easiest way to find out is to only plug a network cable into the adapter that you want to use (make sure the other end is in a live switch port). Click on the "Administrator:  C:\Windows\system32\cmd.exe" window to get to a clean command prompt and type "IPCONFIG". Scroll through the output looking for a physical network card that does not say "Media disconnected" and note its description. Switch back to the sconfig window and look for the network card with a matching description. That's the one you want to configure. Use options 1 and 2 to set its IP and DNS as needed. Optionally, you can continue to set all IP information for the other adapters as well, but once got the server on the network, you can install Core Configurator on it which is a much simpler tool to use. Once the IP is set for the management adapter, you can now join it to your Windows Active Directory domain with option 1.

Now you'll want to step through the remaining options in sconfig to complete the initial configuration of the parent partition environment. Adding a local administrator is optional and will be driven largely by your organization's security practices. If you're going to virtualize a domain controller, it will live on this host, and it will be the only one in your organization, then being able to log on as a local administrator is absolutely vital. If the Hyper-V host is a domain member and can't reach its domain controller (perhaps because it's turned off), you might not be able to connect with Hyper-V Manager. In that case, you'll need to log in as a local administrator so you can do the necessary work, such as starting a restore of the domain controller and/or using WMIC (or, much preferred, PSHyperV) to start the domain controller virtual machine. Because of that, if your organization does not normally share the password for the built-in administrator account with all administrators, you'll need to ensure that all server operators for this unit will have some way to log in locally.

Make sure that you work through all items in option 4 so that you can remotely manage your Hyper-V server. Once you've gone through all the items here, you'll be able to use Computer Management, Hyper-V Manager, and Failover Cluster Manager from a remote Windows 7 or Server 2008 R2 computer. You'll even be able to remotely run PowerShell scripts, if they're digitally signed. Follow up the remote management section with option 7 to enable Remote Desktop connections. The failover cluster feature is only necessary if you will be placing this server in a cluster. You may want to skip the Automatic Update section as that can also be configured through Core Configurator.

Now that your Hyper-V host is on the network, the final step of generic preparation will be to download and install any manufacturer-specific drivers that you'd like to use. Usually, you can just run the driver installer package like you would in a GUI environment. If any drivers require manual installation, it will be easier with Core Configurator. Now is a good time to load that package. Core Configurator does not have an installer. Download the ZIP file, use Windows Explorer to unblock it (open the properties dialog for the ZIP file and look near the bottom; if you don't see an Unblock button, then you don't need to worry about it), and extract the contents. You can either connect to your Hyper-V server at \\HOSTNAME\c$ or you can use COPY or ROBOCOPY at the Hyper-V command prompt to retrieve the files from a network share. Run "Start_Coreconfig.wsf" to start the software.

Core Configurator - Network

Core Configurator – Network

Hyper-V Configuration

Your parent partition is now properly configured for normal operation, so it's time to move on to getting Hyper-V fully functional. At this point, that mainly consists of setting up the virtual switch for your guests to use. Again, it is possible to do this using command-line tools: WMIC, NSVPBIND, and the aforementioned PSHyperV will all do the trick. Generally speaking, these should not be your first tools of choice. Instead, use Hyper-V Manager. If you're not sure how, we published an earlier article with usage instructions. Use it to create a Virtual Network on an adapter that you didn't set up as the management adapter. If you've only got one NIC, then you can use the "Allow management operating system to share this network adapter" checkbox. This is definitely not a preferred configuration. All traffic used by your parent partition will have to share the pipe with all of your virtual machines. The are two concerns with doing so. First, if anything goes wrong with your virtual switch or your management adapter, it will affect the other. Switch misconfigurations will knock the entire server offline. Second, Hyper-V will give all ports equal weighting. For the most part, that may not be an issue as the management adapter generally doesn't move a lot of traffic. It will be very busy during backup windows, however.

If you're going to cluster this Hyper-V Server, make absolutely certain that you pay attention to the name that you give your Virtual Network. It must be the same on all nodes in a cluster or virtual machines will be disconnected from the network if they're migrated between Hyper-V hosts.

Wrap-Up

At this point, you have a fully functioning Hyper-V Server. Make sure that you document everything that you've done. In most cases, there's not a lot of benefit in backing up the parent partition itself because it takes about the same amount of time to rebuild it from scratch as it does to restore it. You will, of course, need to backup your VMs. Now is as good a time as any to install backup software onto your system and get it tested. Once the configuration is as desired, use a tool such as Core Configurator to apply any needed patches from Windows Update. If your Hyper-V Server is standalone, all that's left is testing and deployment. If it will be part of a cluster, continue on to part 2 of this series. We hope this has been helpful to those who would like to install Hyper-V

Windows 8 Client Hyper-V

Set up Client Hyper-V the right way and avoid the frustrations experienced by others. 

Microsoft announced that they are ending support for Windows XP SP3 on April 8th 2014. Since that official announcement I have been receiving a lot of email from Windows XP users making the move to Windows 8 and wondering about support for something like Windows 7's XP Mode. In other words, they want to be able to move to Windows 8 and take Windows XP with them so that they have something to fall back on as they get used to Windows 8.

Well, unfortunately Microsoft did not incorporate anything similar to XP Mode in Windows 8. However, if you are running a 64-bit version of Windows 8 Professional or Windows 8 Enterprise, these versions of the operating system come with a new virtualization tool called Client Hyper-V that you can use to run a virtual Windows XP machine inside of Windows 8.

This blog post is also available as a TechRepublic Screenshot Gallery.

Of course, in order to be able to run Client Hyper-V, your system must meet several hardware requirements. For instance, the 64-bit CPU in your system must support Second Level Address Translation (SLAT) technology and your system must have at least 4GB of RAM. (There are several other system requirements that must be in place as well, but I'll cover these in a moment.)

In most cases, the procedure of setting up is Windows 8's Client Hyper-V is relatively straightforward. However, as I have corresponded with various users performing the necessary steps, I've learned that the procedure can be tricky and confusing - especially if the users were not sure how to get started or ran into problems along the way.

One of the most common problems people were encountering has to do with a key virtualization feature being disabled in the computer's firmware and them not knowing it. Unfortunately, you can't install Client Hyper-V without these features being enabled and as you can imagine the problem just snowballs from there.

As I worked through this problem, I developed a set of steps that eventually led these users to success. To save other users who may be thinking of incorporating Client Hyper-V from frustration, I decided to write an article showing you how to get started with Windows 8's Client Hyper-V the right way.

Requirements

Let me begin with a brief reiteration of the most obvious requirements. As I mentioned, Windows 8's Client Hyper-V is only available in the 64-bit versions of Windows 8 Pro and Windows 8 Enterprise. It is not available in the 32-bit versions nor is it available in Windows 8 basic or in Windows RT.

Again, your system must have at least 4GB of RAM and your 64-bit CPU must support Second Level Address Translation (SLAT) technology. Most of the current crop of 64-bit CPUs from Intel and AMD provide SLAT support.

Checking System Information

Before you attempt to install Windows 8's Client Hyper-V, you need to verify that everything in your system is ready to run a virtualized environment. Unbeknownst to many Windows 8 users, Microsoft added new information gathering features to the old System Information tool thus making it very easy to verify whether your Windows 8 system can run Client Hyper-V.

To launch System Information in Windows 8, use the [Windows] + Q keystroke to access the Apps Search page. Then, type msinfo32 in the text box and click msinfo32.exe, as shown in Figure A. If you prefer, you can use the [Windows] + R keystroke to bring up the Run dialog box, type msinfo32 in the Open text box, and click OK.

Figure A

Accessing the System Information from the Start screen is easy.
Either way you launch the System Information, once it is up and running, you'll want to remain on the System Summary screen, which appears by default. Now, scroll to the bottom of the right panel. When you do, you'll see four key pieces of information about your system's ability to run Hyper-V. As shown in Figure B, all of them should have a value of Yes.

Figure B

In order to successfully install Windows 8's Client Hyper-V, all these values must be set to Yes.
Now, if any of the key virtualization features are disabled in the computer's firmware, System Information will alert you to that fact immediately. My test system for this article is an HP Pavilion P2-1124 and when I ran System Information, I discovered that the Virtualization Enabled in Firmware had a value of No, as shown in Figure C. What this means is that the system has the capability to provide virtualization support, but the feature is disabled in the firmware. So, you just have to enable it.

Figure C

This indicates that the system has the capability to provide virtualization support, but the feature is disabled in the firmware.

In general, if either the Virtualization Enabled in Firmware or the VM Monitor Mode Extensions are set to No, you can enable those features in the firmware. However, if the Second Level Address Translation Extensions or the Data Execution Protection settings are set to No, then you will not be able to use Windows 8's Client Hyper-V.

Enabling the Virtualization support

As you can imagine, there are a wide variety of interfaces and naming conventions when it comes to accessing and changing the Virtualization support in a computer's firmware, so you may want to begin by investigating the technical support section of your computer manufacturer's Web site to learn more about the specifics of your particular system's firmware

As I mentioned, my test system for this article is an HP Pavilion P2-1124 and the only setting that needs to be changed is the Virtualization Enabled in Firmware. However, if on your system the VM Monitor Mode Extensions are also set to No, you should be able to enable them in the firmware. Again, check the technical support section of your computer manufacturer's Web site.

To access my HP computer's firmware Setup Utility, I must press the [Esc] when I am prompted to do so as the system is booting up. I then saw the Startup Menu and selected the Computer Setup item, as shown in Figure D.

Figure D

On the HP Pavilion P2-1124, I see the Startup Menu after pressing [Esc].
Once in the Hewlett-Packard Setup Utility, I pulled down the Security Menu and selected System Security. When I saw the System Security dialog box, I used the arrow keys to change the Virtualization Technology setting from Disable to Enable. This procedure is illustrated in Figure E.

Figure E

In the Hewlett-Packard Setup Utility, the Virtualization Technology setting is on the Security menu.

To put the setting into play, I pressed [F10] and then selected the Save Changes and Exit command from the File menu. I then encountered an Are you sure prompt and selected Yes. The system then rebooted.

Installing Client Hyper-V

With the Virtualization Technology setting now enabled, I can install Client Hyper-V correctly on my example system. While Client Hyper-V is built into the 64-bit versions of Windows 8 Pro and Windows 8 Enterprise, it is not installed by default. However, you can do so easily from the Programs and Features tool.

To install Client Hyper-V, you begin by pressing [Windows] + X to access the WinX menu and then select Programs and Features. When the Programs and Features dialog box appears, you select Turn Windows features on or off. You'll then see the Windows Feature dialog box and will locate the Hyper-V in the list. This process is illustrated in Figure F.

Figure F

You install Windows 8's Client Hyper-V from the Programs and Features tool.
If you expand the Hyper-V tree, you'll see that all the items in the tree are selected, as shown inFigure G.

Figure G

When turning on Hyper-V it is best to enable all of the features.
When you click OK, Windows Features will install Client Hyper-V and then prompt you to Restart your system. This process is illustrated in Figure H.

Figure H

Installing Client Hyper-V requires a Restart.
As the operating system processes the installation, you'll see messages on the screen similar to the one shown in Figure I, both before and after the initial restart.

Figure I

Once you initiate the restart, you'll see a message on the screen similar to this one.
When Windows 8 completes the installation, you'll find you'll find two tiles on the Start Screen for Hyper-V, as shown in Figure J. The Hyper-V Virtual Machine Connection is a Remote Desktop-like tool that you will use to connect to your virtual machine after it is created and the Hyper-V Manager launches the management console that you'll use to create and manage your virtual machine.

Figure J

Hyper-V places two tiles on the Start Screen

Creating a new Hyper-V Virtual Machine is a detailed and intricate procedure in and of itself. As such, I plan to cover the process in detail in several future articles. Stay tuned.

31 Oct 2013

Windows 7 features you'll miss in Windows 8

It's no big secret that Windows 8 is a lot different from Windows 7.
Although Windows 8 has sometimes been described as Windows 7 with a
new interface bolted on, there are actually a number of Windows 7
features missing from Microsoft's latest operating system.

Here are 10 Windows 7 features you won't find as Windows 8 features --
and, no, the Start menu is not on the list.

1. Being able to do everything through a single interface

The biggest thing that I miss about Windows 7 is being able to do
everything through a single interface. Unlike some people, I don't
have a problem with the Modern UI, nor does the missing Start button
bother me. Even so, constantly switching back and forth between the
Start screen and the desktop can be a pain.

2. A unified Control Panel

Another thing that you are likely to miss about Windows 7 is a unified
Control Panel. Yes, the Control Panel still exists in Windows 8, but
it isn't the only place to make configuration changes. The
configuration options are scattered across multiple locations in
Windows 8.

3. Windows XP Mode

One of the big selling points for Windows 7 was Windows XP Mode, which
allowed a fully licensed version of Windows XP to be run within a
virtual machine. Although Windows 8 includes Hyper-V, Windows XP mode
is not officially supported because of Windows XP's impending end of
support. Even so, there are plenty of websites that show how to make
Windows XP Mode work in Windows 8.

4. DVD playback

Windows 8 lacks the ability to play DVDs through Windows Media Center.
While the average corporate user probably doesn't need to play DVDs on
the job, there are plenty of situations in which this omission could
prove to be disruptive. For example, I produce IT training videos and
frequently use the DVD playback capabilities to review my work.

If you need DVD playback capabilities in Windows 8, you can purchase
the Windows Media Center Pack, which installs on top of Windows 8
Professional. Another option is to install a free media player such as
VLC Media Player.

5. Backup and recovery

The native backup tools in Windows have never been its best feature.
Even so, there are those who use it to back up the contents of their
desktops. Among the Windows 8 features, Microsoft has included the
Windows 7 backup tools, but it announced that those tools were being
deprecated in favor of the new Windows 8 File History tool.

In Windows 8.1, the ability to create a Windows 7 style backup has
been completely removed, although it is still possible to restore a
legacy backup. If you need backup capabilities beyond those offered by
the File History feature, you will need to use third-party tools.

6. Detailed blue-screen errors

In previous Windows versions, the dreaded "blue screen of death"
contained helpful diagnostic information. Sure, wading through the
information presented on a blue screen was not a task for amateurs,
but Microsoft was at least kind enough to provide diagnostic
information.

In Windows 8 the old-school blue screen of death has been replaced by
a new blue screen that simply shows a frown face and states, "Your PC
ran into a problem that it couldn't handle, and now it needs to
restart."

7. Recent document lists

One of the downsides to no longer having a traditional Start menu is
that the recent document lists are also gone. Thankfully, many
applications (such as Microsoft Office 2013) now maintain their own
application-level recent document lists.

8. Libraries

Windows has long used libraries such as Documents, Photos and
Downloads to help users organize file data. The libraries still exist
in Windows 8, but Microsoft has hidden them in Windows 8.1 as a way of
trying to get users to begin saving data onto SkyDrive.

You can still access the libraries in Windows 8.1, but to do so, you
have to open File Explorer's View tab, click on the Navigation Pane
option and select the Show Libraries option.

9. The Windows Experience Index

The Windows Experience Index has been removed from Windows 8.1.
Although some people have criticized the index as being a meaningless
score, I have always found it to be a helpful way of quickly
evaluating the effect of hardware upgrades without having to delve
into Performance Monitor. Fortunately, there are plenty of free,
third-party tools you can use to benchmark desktop performance.

10. Gadgets

In July 2012, Microsoft published a security advisory warning
customers that Windows gadgets contained a security vulnerability that
could allow malicious code to be run. Microsoft's "fix" for the
problem was to provide a patch that disables gadgets in Windows Vista
and Windows 7. It should therefore come as no surprise that desktop
gadgets have been removed from Windows 8.

Microsoft's stance is that gadgets are unnecessary in Windows 8 since
data can be conveyed through live tiles on the Start screen. Even so,
there is no denying that gadgets can do things that live tiles can't,
such as monitor running processes and CPU usage. Fortunately, several
third-party vendors offer software to re-enable gadget support.

Although there are a number of features that have been removed from
Windows 8 or Windows 8.1, the removal of features is not unique to
this operating system. Every version of Windows in recent memory has
had features that were either deprecated or removed.

30 Oct 2013

Using MPLS In The Enterprise

In the data center, the MPLS/VPN architecture offers an attractive alternative to increasing the size of Layer 2 domains. Some players in the industry are promoting protocols such as Transparent Interconnection of Lots of Links (TRILL) to solve Spanning Tree Protocol (STP) scalability problems. Rather than making Layer 2 networks bigger to enable cloud and other services, why not move toward a Layer 3-centric data center network? MPLS/VPN has been deployed in large networks for a decade; the technology is proven, and you can adopt best practices on MPLS/VPN available on the Internet.

The introduction of MPLS within the enterprise network means you can move away from VLANs for segmentation. Let's examine how segmentation works in an MPLS network. The MPLS/VPN architecture divides routers into three classes: provider (P), provider edge (PE) and customer edge (CE). The P routers are core routers. PE routers are edge routers that connect to CE routers. This terminology is based on service provider usage. In the enterprise, the PE routers might be the demarcation between a department or building and the enterprise backbone.

You may have heard of RFC2547bis VPNs in the context of MPLS. This document defines how multiple MPLS labels are used to provide virtual segmentation. On the PE routers, virtual routing and forwarding instances (VRFs) separate routing information such that each "customer" can use overlapping IP address space. The PE routers encapsulate IP packets using two labels. The P routers make forwarding decisions based on labels; destination IP addresses are effectively hidden in the core. The CE routers are unaware of labels and serve as generic IP routers.

The combination of the Border Gateway Protocol (BGP) and a label distribution protocol are used to communicate prefix and label information. These protocols permit a nearly automatic set-up of the Layer 3 VPN as any-to-any or hub-and-spoke topologies. Compare this with the messy techniques required to scale and manage VLANs in large Layer 2 networks.

While I see Layer 3 VPNs as the primary driver for the introduction of MPLS in the enterprise, MPLS has other uses. Network architects use MPLS to build Layer 2 VPNs in the form of point-to-point or any-to-any topologies. Point-to-point connections are commonly referred to as pseudowires or virtual leased lines. Frame relay and Ethernet are two examples of Layer 2 protocols that can be transported across the MPLS backbone. Virtual Private LAN Service (VPLS) is an any-to-any topology. The MPLS network emulates a switch that connects all sites in a single Layer 2 domain.

MPLS is one of many enabler technologies for the transition from IPv4 to IPv6. Recall that the core of MPLS does not make forwarding decisions based on the IP header. The use of labels hides the IP packet, creating tunnels between PE devices. The core routers are largely indifferent to IP version. A technology called 6PE encapsulates IPv6 packets at the CE with two labels. The remote PE strips the label before forwarding to the CE.

In 6PE networks, the PE routers must be IPv6-ready. The P routers in the core do not need to fully support IPv6. How is this relevant to IPv6 transition? The number of routers you must configure and potentially upgrade for IPv6 is limited to PE and CE routers. The addition of IPv6 functionality can be performed incrementally. You may have a few IPv6-enabled LANs that you want to communicate with IPv6 LANs in other regions. Only the PE and CE routers associated with those IPv6 LANs must be configured for IPv6. Your path to a fully enabled IPv6 network is simplified.

You are not operating in uncharted territory by deploying MPLS in your enterprise. Although most MPLS deployments are in service provider networks, enterprises are introducing MPLS into their networks. The use cases discussed in this article--Layer 3 VPN, Layer 2 VPN and IPv6 transition--are just a few of many ways in which MPLS is used. The next time your network team meets to discuss the roadmap for the network, consider how MPLS may meet the requirements of the today's network.

VMware Has To Step Up On NFS

VMware brought long-awaited storage improvements in the most recent version of vSphere, most significantly VSAN and the Flash Read Cache. However, several significant promises remain unfulfilled.

It's time for VMware to upgrade its support for file storage (as opposed to block storage) and embrace the pioneering vendors who are building storage systems specifically for the virtualization environment.

File-based storage makes sense for virtualization. The hypervisor presents virtual disks to the virtual machines it hosts. It stores those virtual disks, and the rest of the information it stores about the VM, as files. Because functions like vMotion rely on shared storage, VMware had to create a clustered file system, VMFS, to allow multiple hosts to access the same SAN volumes. Before VAAI, this lead to severe limitations on how many VMs could be stored in a single datastore/volume. It still results in some complexities for administrators.

As a result, managing vSphere with NFS storage is somewhat simpler than managing an equivalent system on block storage. Even better, a good NFS storage system, because it knows which blocks belong to which virtual machine, can perform storage management tasks such as snapshots, replication and storage quality of service per virtual machine, rather than per volume.

Recognizing that we have to make a transition to the virtual machine as the unit of storage management VMware has for years been talking about vVols, but there was no vVol news at VMWorld this year. A vVol is essentially a micro-LUN, where each virtual disk of each virtual machine is stored on the SAN array as a separate volume so the array can provide functions like snapshots or replication on a per-VM basis.

We can't do this today because the block I/O protocols require the initiator (host) to log into the target (array) for each volume they mount, and there are limits to the number of logins the array can support at any one time. So we build datastores that put multiple VMs in a single volume because the array, or more accurately the protocol used to access the array, can't support more than say 1024 connections.

Also, vVols require storage vendors to make some significant changes to their systems to support micro-LUNS and the demultiplexer function. My best guess is that vVols won't really hit the market in a form users can put in production for another two years or more.

Better NFS support will empower storage vendors to innovate and strengthen the vSphere ecosystem and fill the gap until vVols are ready. NFS support will also provide an alternative once vVols hit the market.

The first step would be for VMware to acknowledge that NFS has advanced in the past decade. Today vSphere supports version 3.0 of NFS—which is seventeen years old. NFS 4.1 has much more sophisticated security, locking and network improvements than NFS 3.0. The optional pNFS extension can bring the performance and multipathing of SANs with centralized file system management.

VMware should also extend the NFS version of VAAI to support the per-VM snapshots now starting to appear on storage systems from vendors including Tintri, Simplivity, Sanbolic, Nutanix and even VMware's own Virsto. With VAAI integration, the storage system snapshots could completely replace VMware's log-based snapshots for vStorage API for Data Protection backups.

VMware wants the future of vSphere storage to be either VSAN on server-attached storage or vVols to EMC storage, I hope it can be a bit more liberal in its view and upgrade vSphere's NFS support. While I'm making requests, adding SMB 3 would make sense too, but that's probably a bridge too far.