As always, proper planning is critical to achieving a quick and successful deployment. Because this article is more of a how-to than a complete deployment guide, you are encouraged to read the entire guide from start to finish before doing anything. We are planning to release a very thorough document in the future.
Things to Remember
- Microsoft usually has at least two ways to do any one thing. If you see a step here and you know of or prefer a different way, that's perfectly acceptable.
- When working at the command or PowerShell prompt, the [TAB] key is your friend. You can navigate through deep directory structures and enter long file names with ease by keying in the first few letters and hitting [TAB] to let Windows figure it out. It will cycle through file names and directory names. In a PowerShell prompt, it will cycle through those and in-context commands or command switches. For instance, "CD \Pr[TAB]" will get Windows to suggest "CD \Program Files". Another press of [TAB] will have it suggest "CD \Program Files (x86)".
Initial Installation
To actually install Hyper-V is very simple. You'll need to acquire the DVD image from Microsoft and burn it to a disc. Assuming that your physical host is prepared (i.e., hard drives partitioned as desired), you simply boot to the DVD and follow the prompts. There really aren't any options to set or change during the installation phase.
Beginning Configuration
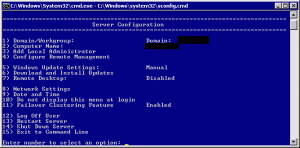
The first part of setting up your Hyper-V host is pretty much the same as setting up a machine running Windows Server Core. What's especially helpful is that "sconfig.cmd" will run automatically at startup so you'll be immediately presented with a simplistic way to configure your system. There is nothing here that can't be done at the command-line and you're free to investigate the contents of the sconfig.vbs file to see what's going on under the hood.

sconfig.cmd
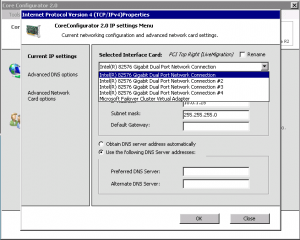
Start by renaming your server according to your company standards (option 2 on the sconfig menu). Once that has been done and the server has rebooted, configure the network card that you'll be using to manage the physical host with (option 8 on the sconfig menu). Hopefully, your server has multiple network adapters (optimally two for a standalone server and five for a clustered server). For the beginning portion, the only one you are required to configure is the management adapter. If you can't tell from looking at the sconfig menu which adapter is which, the easiest way to find out is to only plug a network cable into the adapter that you want to use (make sure the other end is in a live switch port). Click on the "Administrator: C:\Windows\system32\cmd.exe" window to get to a clean command prompt and type "IPCONFIG". Scroll through the output looking for a physical network card that does not say "Media disconnected" and note its description. Switch back to the sconfig window and look for the network card with a matching description. That's the one you want to configure. Use options 1 and 2 to set its IP and DNS as needed. Optionally, you can continue to set all IP information for the other adapters as well, but once got the server on the network, you can install Core Configurator on it which is a much simpler tool to use. Once the IP is set for the management adapter, you can now join it to your Windows Active Directory domain with option 1.
Now you'll want to step through the remaining options in sconfig to complete the initial configuration of the parent partition environment. Adding a local administrator is optional and will be driven largely by your organization's security practices. If you're going to virtualize a domain controller, it will live on this host, and it will be the only one in your organization, then being able to log on as a local administrator is absolutely vital. If the Hyper-V host is a domain member and can't reach its domain controller (perhaps because it's turned off), you might not be able to connect with Hyper-V Manager. In that case, you'll need to log in as a local administrator so you can do the necessary work, such as starting a restore of the domain controller and/or using WMIC (or, much preferred, PSHyperV) to start the domain controller virtual machine. Because of that, if your organization does not normally share the password for the built-in administrator account with all administrators, you'll need to ensure that all server operators for this unit will have some way to log in locally.
Make sure that you work through all items in option 4 so that you can remotely manage your Hyper-V server. Once you've gone through all the items here, you'll be able to use Computer Management, Hyper-V Manager, and Failover Cluster Manager from a remote Windows 7 or Server 2008 R2 computer. You'll even be able to remotely run PowerShell scripts, if they're digitally signed. Follow up the remote management section with option 7 to enable Remote Desktop connections. The failover cluster feature is only necessary if you will be placing this server in a cluster. You may want to skip the Automatic Update section as that can also be configured through Core Configurator.
Now that your Hyper-V host is on the network, the final step of generic preparation will be to download and install any manufacturer-specific drivers that you'd like to use. Usually, you can just run the driver installer package like you would in a GUI environment. If any drivers require manual installation, it will be easier with Core Configurator. Now is a good time to load that package. Core Configurator does not have an installer. Download the ZIP file, use Windows Explorer to unblock it (open the properties dialog for the ZIP file and look near the bottom; if you don't see an Unblock button, then you don't need to worry about it), and extract the contents. You can either connect to your Hyper-V server at \\HOSTNAME\c$ or you can use COPY or ROBOCOPY at the Hyper-V command prompt to retrieve the files from a network share. Run "Start_Coreconfig.wsf" to start the software.

Core Configurator – Network
Hyper-V Configuration
Your parent partition is now properly configured for normal operation, so it's time to move on to getting Hyper-V fully functional. At this point, that mainly consists of setting up the virtual switch for your guests to use. Again, it is possible to do this using command-line tools: WMIC, NSVPBIND, and the aforementioned PSHyperV will all do the trick. Generally speaking, these should not be your first tools of choice. Instead, use Hyper-V Manager. If you're not sure how, we published an earlier article with usage instructions. Use it to create a Virtual Network on an adapter that you didn't set up as the management adapter. If you've only got one NIC, then you can use the "Allow management operating system to share this network adapter" checkbox. This is definitely not a preferred configuration. All traffic used by your parent partition will have to share the pipe with all of your virtual machines. The are two concerns with doing so. First, if anything goes wrong with your virtual switch or your management adapter, it will affect the other. Switch misconfigurations will knock the entire server offline. Second, Hyper-V will give all ports equal weighting. For the most part, that may not be an issue as the management adapter generally doesn't move a lot of traffic. It will be very busy during backup windows, however.
If you're going to cluster this Hyper-V Server, make absolutely certain that you pay attention to the name that you give your Virtual Network. It must be the same on all nodes in a cluster or virtual machines will be disconnected from the network if they're migrated between Hyper-V hosts.
Wrap-Up
At this point, you have a fully functioning Hyper-V Server. Make sure that you document everything that you've done. In most cases, there's not a lot of benefit in backing up the parent partition itself because it takes about the same amount of time to rebuild it from scratch as it does to restore it. You will, of course, need to backup your VMs. Now is as good a time as any to install backup software onto your system and get it tested. Once the configuration is as desired, use a tool such as Core Configurator to apply any needed patches from Windows Update. If your Hyper-V Server is standalone, all that's left is testing and deployment. If it will be part of a cluster, continue on to part 2 of this series. We hope this has been helpful to those who would like to install Hyper-V
No comments:
Post a Comment